Updated: 2022-11-21
As a temporary measure, the Canada Revenue Agency (CRA) and Revenu Québec recognize electronic signatures as having met the signature requirements on T183, T183CORP, TP-1000 and CO-1000 forms that have the first five digits of the taxpayer's social insurance number or business number hidden. The CRA already recognizes electronic signatures on the AuthRep (former T1013) and business consent forms (former RC-59). For your convenience, TaxCycle also supports electronic signatures on other forms. See the Forms and Templates That Support E-signatures help topic.
TaxCycle integrates with DocuSign® so you can send documents to your clients for signature directly from TaxCycle, track the receipt of those signatures, store those documents in DocuSign® (as long as you maintain a subscription) and download them from within TaxCycle. Note that DocuSign® has a limit of 100 envelopes per user per year. If you exceed 100 envelopes in your first year, their sales team will contact you to help you choose the plan that best meets your needs as part of your renewal process.
Setting up DocuSign®
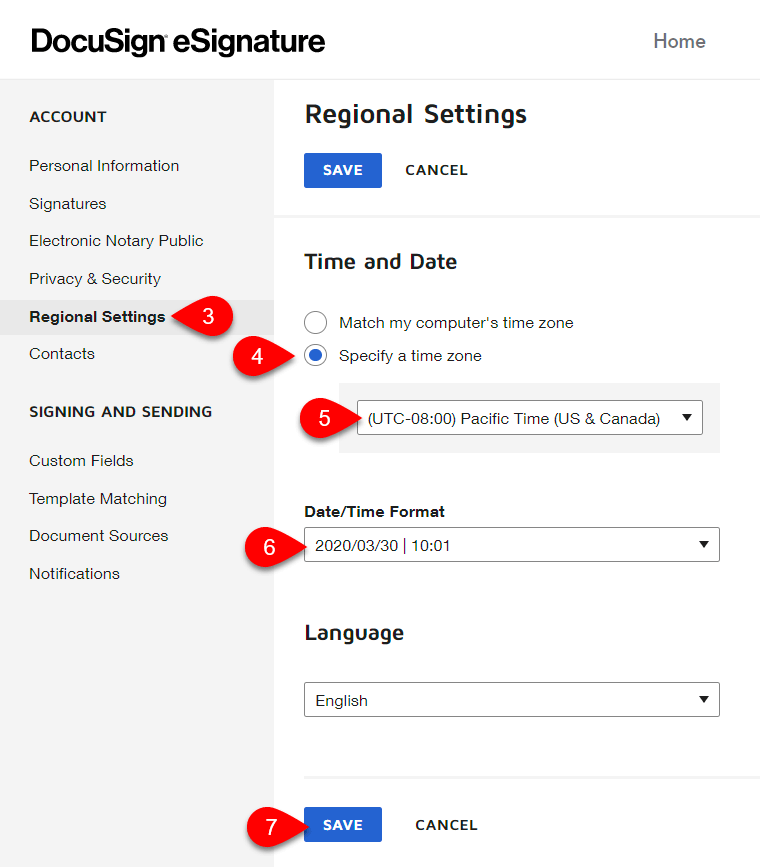
To send the signing date back to TaxCycle in the correct format, please set the Date/Time Format in DocuSign® to year/month/day as this is the format expected on forms in TaxCycle.
For full instructions on configuring these settings, read the Time and Date Settings for Your Account topic on the DocuSign® website.
- Log into account.docusign.com.
- Click on your account and select My Preferences.
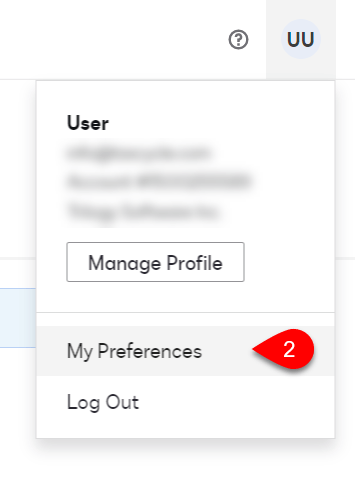
- Click Regional Settings.
- Select Specify a Time Zone.
- Select your Time Zone.
- Important! Set the Date/Time Format to year/month/day (YYYY-MM-DD).
- Click SAVE.
Connecting TaxCycle to Your DocuSign® Account
- Create an account with a supported e-signature service (see above).
- To open options, go to the File menu, then Options. Or, if you are on the Start screen, click Options in the blue bar on the left.
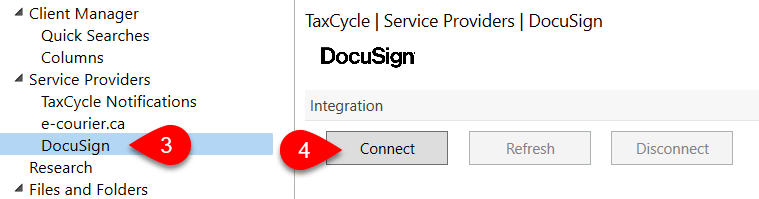
- On the left, expand the Service Providers section and click on the DocuSign page.
- Click Connect.
- A new window will open for you to log into your DocuSign account. Enter the email address and password for your e-signature account to Log In.
- You will be asked to give permission for TaxCycle to connect with the service. Click Accept. This only happens the first time you connect.
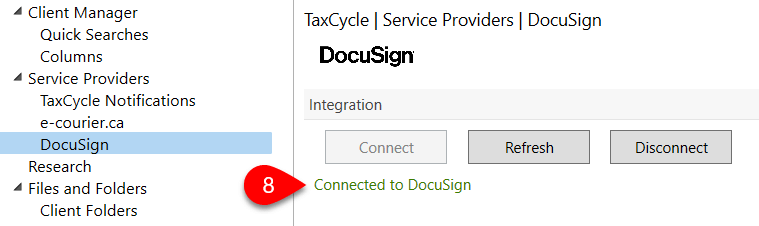
- Once you see the message confirming that the connection is successful, close the browser window.
- Back in options, you will see a message confirming you are connected. You may now close the Options dialog box. The connection will remain active.
Sending a Document for Signature
The example below shows how to send the T183 for signature by printing a single form. You can use the same settings when configuring a print set, or when printing a different template or form. If a form like the T183 is part of the print set, all the pages of the PDF go to DocuSign® with the fields on the T183 marked for signature.
For a complete list of forms and templates in TaxCycle that support electronic signatures, see the Forms and Templates That Support E-Signatures help topic.
- Make sure to enter the client's (or signing officer's) first name, last name and email address on the Info worksheet.

- Open the T183 form.
- Press Ctrl+Shift+P, click Print/PDF Form in the Tools menu, or right-click on the form and select Print/PDF Form. (If configuring a print set, click the edit link for the print set in the Print/PDF sidebar.)
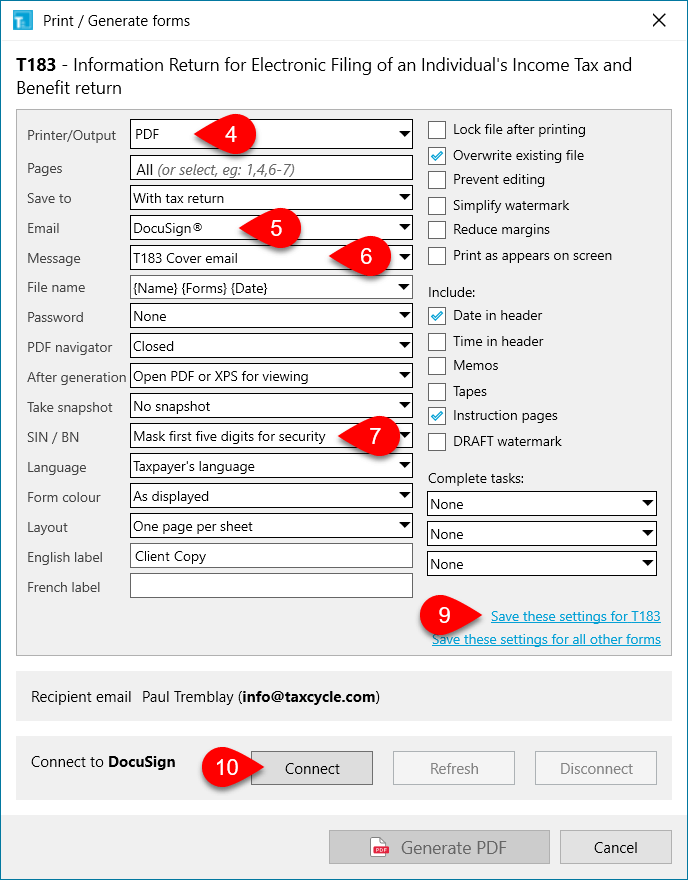
- From the Printer/Output menu, select PDF.
- From the Email menu, select DocuSign®.
- From the Message menu, select T183 Cover Email.
- From the SIN/BN menu, select Mask first five digits for security to obscure social insurance numbers and business numbers from the forms. (We strongly recommend using this option when sending documents for signatures.)
- Set any other PDF options as required. See printer/output options for details.
- To save these settings and use them every time you print the T183, click the link to Save these settings for T183.
- The current status of your connection to DocuSign® shows at the bottom left of the dialog box. If required, click Connect to open a browser window and sign into your DocuSign® account. If this is your first time connecting to DocuSign® from TaxCycle, you will need to give permission for TaxCycle to connect with the service. (You can also sign into your account from the DocuSign® page in options, see Connecting TaxCycle to Your DocuSign® Account.)
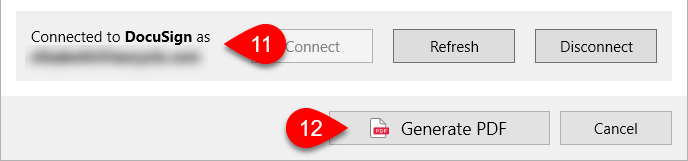
- Once connected, the status changes to show that TaxCycle is Connected to DocuSign®. The connection remains active even after closing this dialog box
- Click Generate PDF to send the document for signature through DocuSign®.
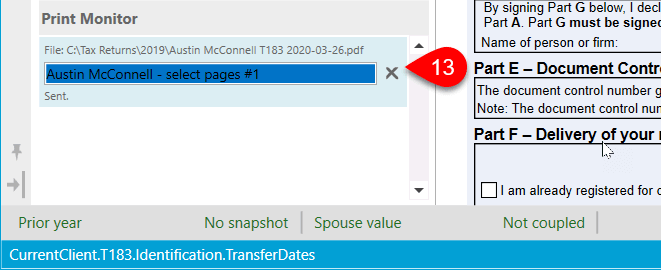
- The Print Monitor at the bottom of the sidebar shows you the status as TaxCycle sends the document to DocuSign®.
- At this point, DocuSign® takes over until the client signs the document; it will send you an email when your client signs the document.
- The TaxCycle Notification Service watches and captures notifications of signing events coming from DocuSign®. Then, if TaxCycle is open and connected to the Notification Service, it receives those messages and tracks them in the return. You can also check manually for any notifications. See Check for Signed Documents help topic.
- TaxCycle tracks the tasks and status of electronic signature requests in the taxpayer's workflow and updates these workflow tasks as it receives messages from the Notification Service. Once TaxCycle receives notice that your client signed the document, click the view link to download a signed copy. See the Track and Download Signed Documents help topic.
Warning! If you send a document for e-signature via TaxFolder or DocuSign®, and then create a new, different file with the same name and SIN, the new file will not be able to receive the response message from the e-signature provider. To ensure the security of your client information, only the originating file can ever receive the response. You can, of course, log into your account and download the signed document from there.