Menu

Print/PDF Slips

Updated: 2024-01-23

Print the Open Slips Return

  1. Click on the Print/PDF sidebar or press Ctrl+P on your keyboard.
  2. At the top of the Print/PDF sidebar, choose the slip type you want to print: Original, Amended or Cancelled. In TaxCycle T4/T4A, make sure you also choose the type of slip to print: T4, T4A, T4PS, T4A-RCA, Québec RL-1 or RL-2 slips.
  3. Check the box(es) for the set(s) you want to print. TaxCycle determines which sets to print based on which forms are used and the condition associated with the print set in Print/PDF Options. If you change the selection, a blue asterisk appears to indicate you have overridden the default. Click on the asterisk again to revert to the default print set selection.
  4. If you want to use a different printer or file output (such as Adobe PDF) for a particular print set, click on the link to edit print set to configure the printer and output format.
  5. At the bottom of the panel is the list of forms that will print in the order the forms will be printed, grouped by print set. TaxCycle decides which forms appear in the list based on what is used in the return and what is configured for each print set. You can change the selection of slips if you only want to print certain slips.
  6. Click on any form or slip to see a preview of it.
  7. Click on Show all forms in print set at the top of the forms list to see original, amended or cancelled slips that aren’t part of the initial selection. 
  8. When you’re ready, click the Print Selected button at the bottom of the pane to begin printing.

Screen Capture: Print open slips return in TaxCycle

Print to PDF and Upload to TaxFolder

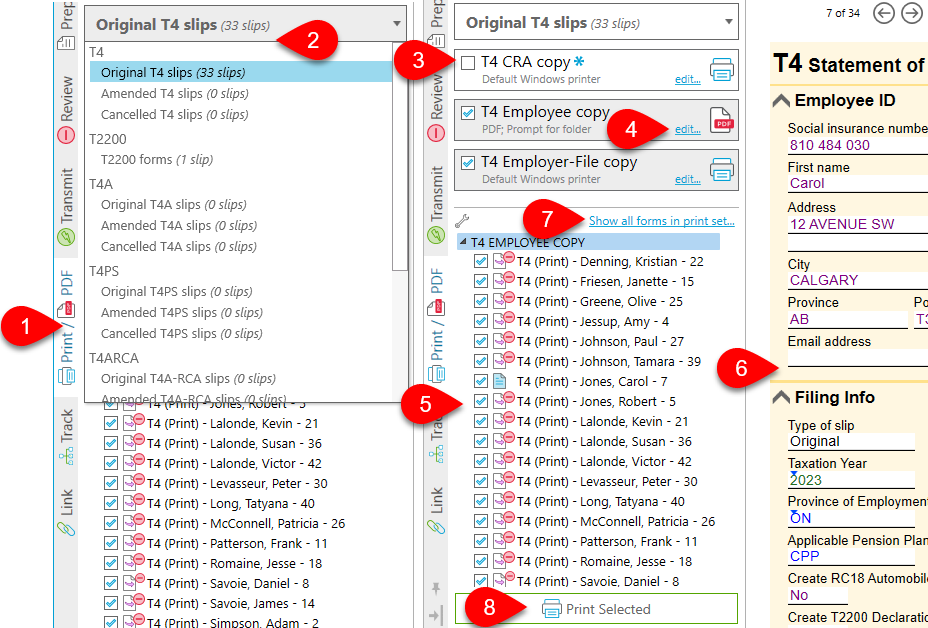
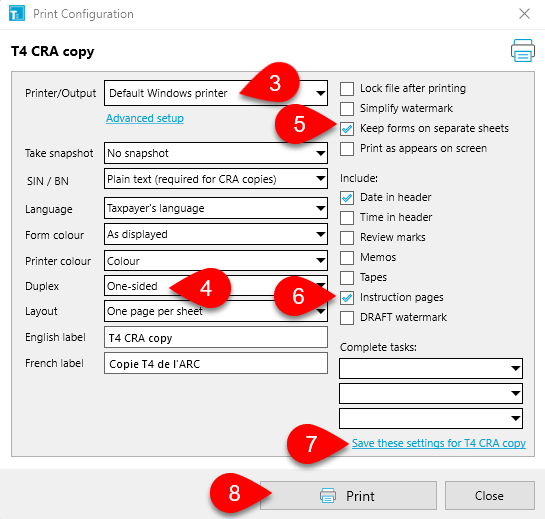
You can print individual slips to PDF in TaxCycle and then manually upload them to a client engagement in TaxFolder.

  1. Click on the Print/PDF sidebar or press Ctrl+P on your keyboard.
  2. Click the edit link in the Print set to open the Print Configuration dialog box.
  3. From the Printer/Output menu, select PDF.
  4. Select where you want to save your PDF.
  5. From the Email menu, select None.
  6. Check Lock file after printing to prevent changes to the data in the TaxCycle file. See the File Locking help topic.
  7. Select Prevent editing to lock the PDF file so that it cannot be edited. The recipient can still open, view and print the file, but the file cannot be changed.
  8. To separate the slips out into individual files, check Create one file for each recipient.
  9. Select Publish to SlipSync to make the slip data available should you prepare the related T1 or T3 return for a slip recipient. See the SlipSync help topic.
  10. From the SIN/BN menu, select Mask first five digits for security to obscure social insurance numbers and business numbers from the forms.
Screen Capture: Generate PDF to Upload to TaxFolder
  1. If you don’t want to include the instructions on the second page of the PDF file, clear the Instruction pages check box.
  2. Set any other PDF options as required. See the Printer and PDF Output Options help topic.
  3. Click Save these settings for T4 Employee copy (or whichever print set you are editing) to save these settings back to Print options.
  4. Click Generate PDF
  5. Once you have saved your PDF, open the client engagement in TaxFolder and upload the file to the Preparer Files section. If you have a lot of slips, you can create a ZIP file and upload it to TaxFolder. The recipient will receive an email notifying them that there are documents ready to view and download. 

Screen Capture: Upload Files to the Client Engagement in TaxFolder

Share Slips to the TaxFolder Client Portal

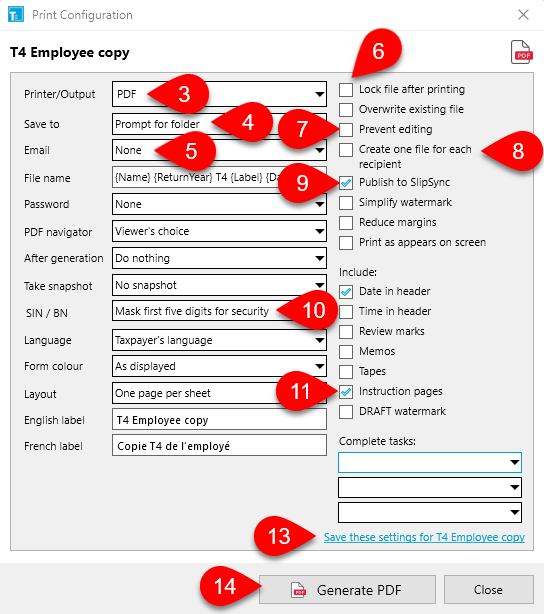
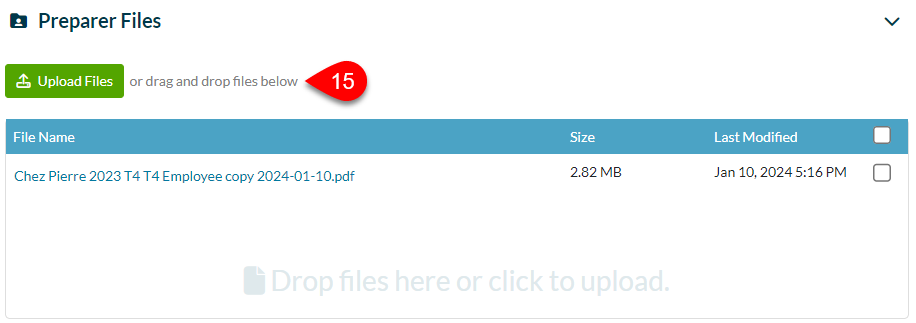
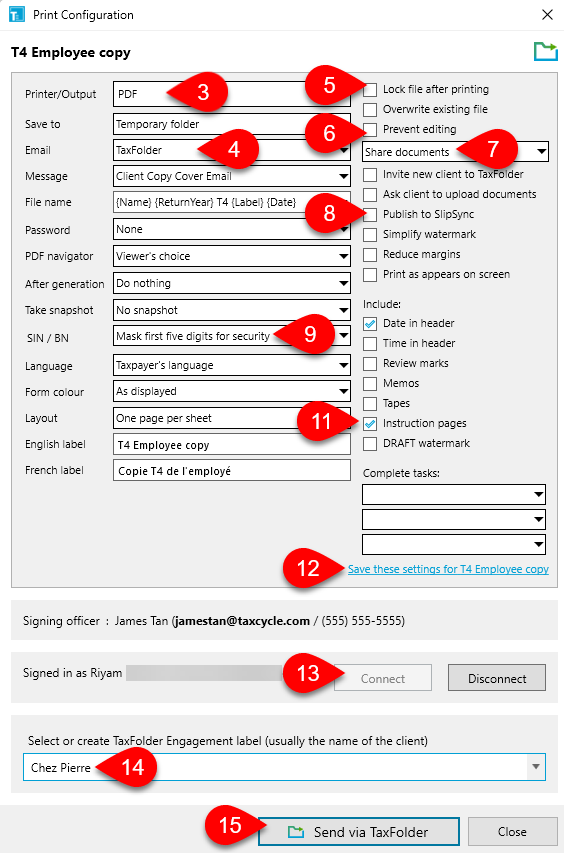
You can also share slips with recipients by uploading them to the TaxFolder Client Portal from TaxCycle.

  1. Click on the Print/PDF sidebar or press Ctrl+P on your keyboard.
  2. Click the edit link in the Print set to open the Print Configuration dialog box.
  3. From the Printer/Output menu, select PDF.
  4. From the Email menu, select TaxFolder.
  5. Check Lock file after printing to prevent changes to the data in the TaxCycle file. See the File Locking help topic.
  6. Check Prevent editing to lock the PDF file so that it cannot be edited. The recipient can still open, view and print the file, but the file cannot be changed.
  7. Select Share documents. This sends your client an email notifying them that there are documents ready to view. See the Share Documents With Clients via TaxFolder From TaxCycle help topic
  8. Check Publish to SlipSync to make the slip data available should you prepare the related T1 or T3 return for a slip recipient. See the SlipSync help topic.
  9. From the SIN/BN menu, select Mask first five digits for security to obscure social insurance numbers and business numbers from the forms. (We strongly recommend using this option when sending documents.)
  10. Set any other PDF options as required. See the Printer and PDF Output Options help topic.
  11. If you don’t want to include the instructions on the second page of the PDF file, clear the Instruction pages check box.

Screen Capture: Send slips via TaxFolder

  1. Click Save these settings for T4 Employee copy (or whichever print set you are editing) to save these settings back to Print options.
  2. The current status of your connection to TaxFolder shows at the bottom of the dialog box. If required, click Connect to sign in to TaxFolder with your TaxCycle account.
  3. The first time you share a document via TaxFolder, it automatically creates an engagement in TaxFolder with the client’s name. If you want to associate a request with an existing engagement, select the client’s name from the list. You can also type in this field to enter a custom engagement label.
  4. Click Send via TaxFolder.

Email Slips 

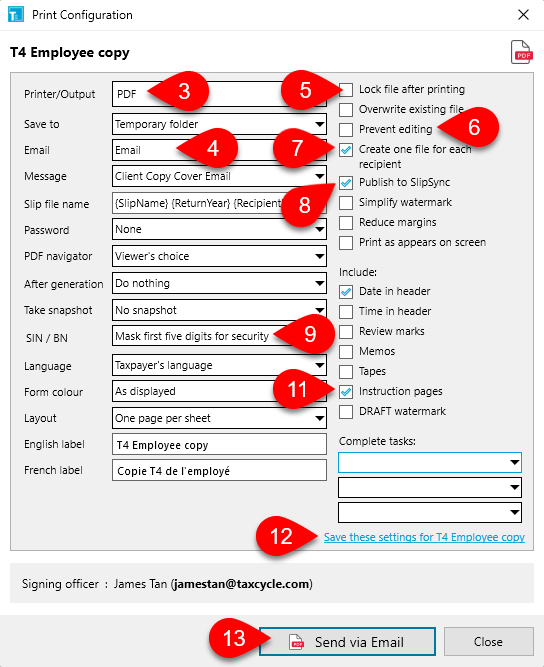
You can distribute T4, T4A, T5 or T4FHSA slips by email. If you distribute by email, you must receive consent from employees or recipients, in writing or in electronic format, before sending the slips by email. You can distribute slips without obtaining consent by using an employer and payer’s secure portal. Read the CRA’s page on slips distribution to learn more. 

This method only works if you are using a desktop email client, such as Microsoft® Outlook or Apple Mail. You can send individual slips by email, but if you are sending the slips to employees, you will need to manually enter the email address for each employee. 

  1. Click on the Print/PDF sidebar or press Ctrl+P on your keyboard.
  2. Click the edit link in the Print set to open the Print Configuration dialog box.
  3. From the Printer/Output menu, select PDF.
  4. From the Email menu, select Email.
  5. Check Lock file after printing to prevent changes to the data in the TaxCycle file. See the File Locking help topic.
  6. Check Prevent editing to lock the PDF file so that it cannot be edited. The recipient can still open, view and print the file, but the file cannot be changed.
  7. To separate the slips out into individual files, check Create one file for each recipient.
  8. Check Publish to SlipSync to make the slip data available should you prepare the related T1 or T3 return for a slip recipient. See the SlipSync help topic.
  9. From the SIN/BN menu, select Mask first five digits for security to obscure social insurance numbers and business numbers from the forms. (We strongly recommend using this option when sending slips by email.)
  10. Set any other PDF options as required. See the Printer and PDF Output Options help topic.

Screen Capture: Send slips via email in TaxCycle

  1. If you don’t want to include the instructions on the second page of the PDF file, clear the check box next to Instruction pages.
  2. Click Save these settings for T4 Employee copy (or whichever print set you are editing) to save these settings back to Print options.
  3. Click Send via Email to open your preferred desktop email client and email the slip to the recipient. Note that a pop-up window will appear for each slip you are emailing, so this method may not be practical if you are emailing a large number of slips.

Print Individual Slips

Federal slips and Québec RL slips printed from TaxCycle fit in standard window envelopes. If you wish to send multiple slips in a larger envelope, you can quickly print labels for all recipients in a slips return.

  1. Click on the Print/PDF sidebar or press Ctrl+P on your keyboard.
  2. Click the edit link in the Print set to open the Print Configuration dialog box.
  3. Choose a printer from the Printer/Output menu. The list of available options in this dialog box changes depending on the printer output. Refer to the Printer and PDF Output Options help topic for details on specific options.
  4. From the Duplex menu, select whether you want to print on one or both sides of a sheet of paper. This option only shows for printers with duplex capabilities.
  5. Check Keep forms on separate sheets when duplexing to leave the back side of the last page blank, so that the first page of the next form does not print on the back of the previous form.
  6. If you don’t want to include the instructions on the second page, clear the check box next to Instruction pages.
  7. Click Save these settings for T4 CRA copy (or whichever print set you are editing) to save these settings back to Print options.
  8. Click Print.
  9. If you are not using standard window envelopes, you can print custom labels from TaxCycle. Read the Print Labels for Slip Recipients help topic to learn more. 

Screen Capture: Print paper slips in TaxCycle