Ten Options to Review Before EFILE Opens
Get ahead of the game by setting your TaxCycle Options before the EFILE systems opens on February 24, 2025. Reviewing your options now will save you time later.
Where Do I Find All These Options?
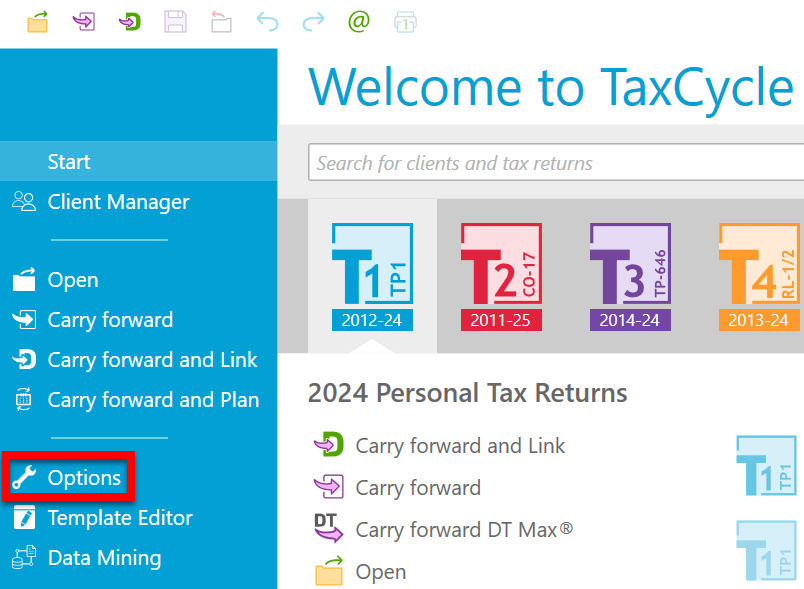
For most of the tips below, you must first open TaxCycle Options. On the Start screen, click Options in the blue bar on the left. If you have a return open, go to the File menu, then click Options.
When you create a new tax return, TaxCycle inserts the Organization and Preparer details stored in Options into the Engagement worksheet. TaxCycle uses this contact information on various forms and templates for correspondence. It will also display a Quick Fix review message if the details on the Engagement worksheet do not match those set in Options.
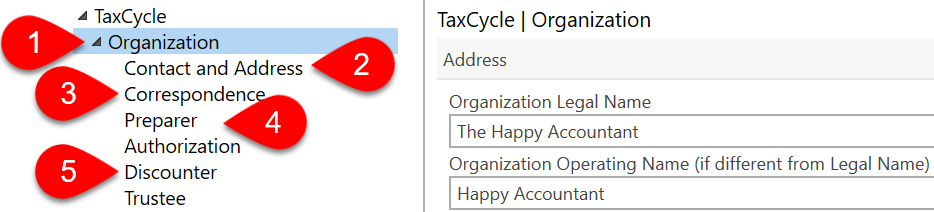
- Expand the Organization section in Options.
- Enter the address information on the Contact and Address page. If you’re using Options Profiles to share settings across your office, add this page to the profile so that everyone has the same settings. Read the Contact and Address Options help topic for more details.
- On the Correspondence page, insert the logo and signature for the practice. These appear on the letter templates. Include this page in Options Profiles as well if everyone in your office will share these settings. Read the Correspondence Options help topic to learn more.
- On the Preparer page, enter the name, designation and signature file for the preparer. If you’re using Options Profiles, exclude this page so each preparer can set their information.
- If you prepare discounted tax returns for your clients, enter your information on the Discounter page so TaxCycle can automatically insert this information on the Engagement worksheet when you create or carry forward a return. Read the Discounter Options help topic to learn more.
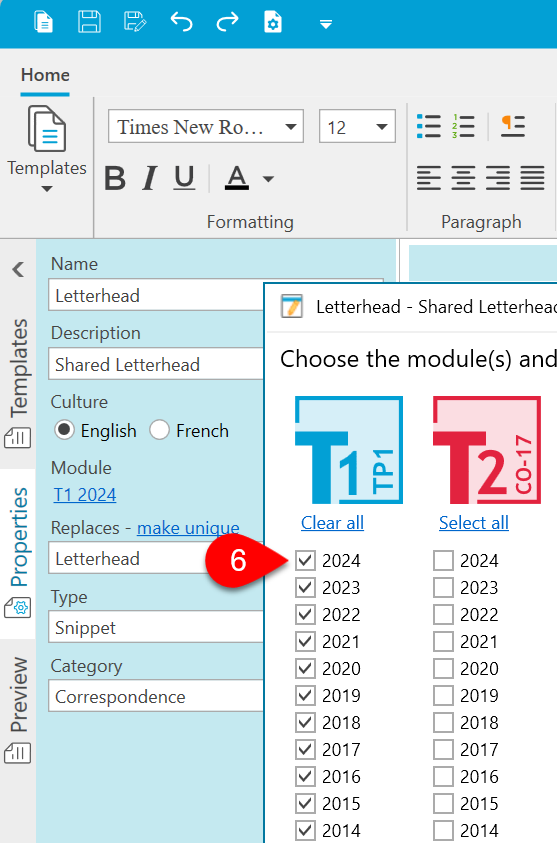
- If you edited your Letterhead or Closing snippets last year instead of inserting the logo and signatures files in options, make sure you apply the current-year modules to those snippets in the template properties in the Template Editor. Read the Multi-Year Templates and Roll Forward help topic to learn more.
2. Authorization Details
Your clients must authorize you to access their data through the CRA's Represent a Client service in order to download their data from Auto-fill My Return (AFR) and EFILE tax returns on their behalf. Complete this information in Authorization Options so that it flows into every tax return you create. TaxCycle will also display a Quick Fix review message if the details in the tax return do not match those set in Options.
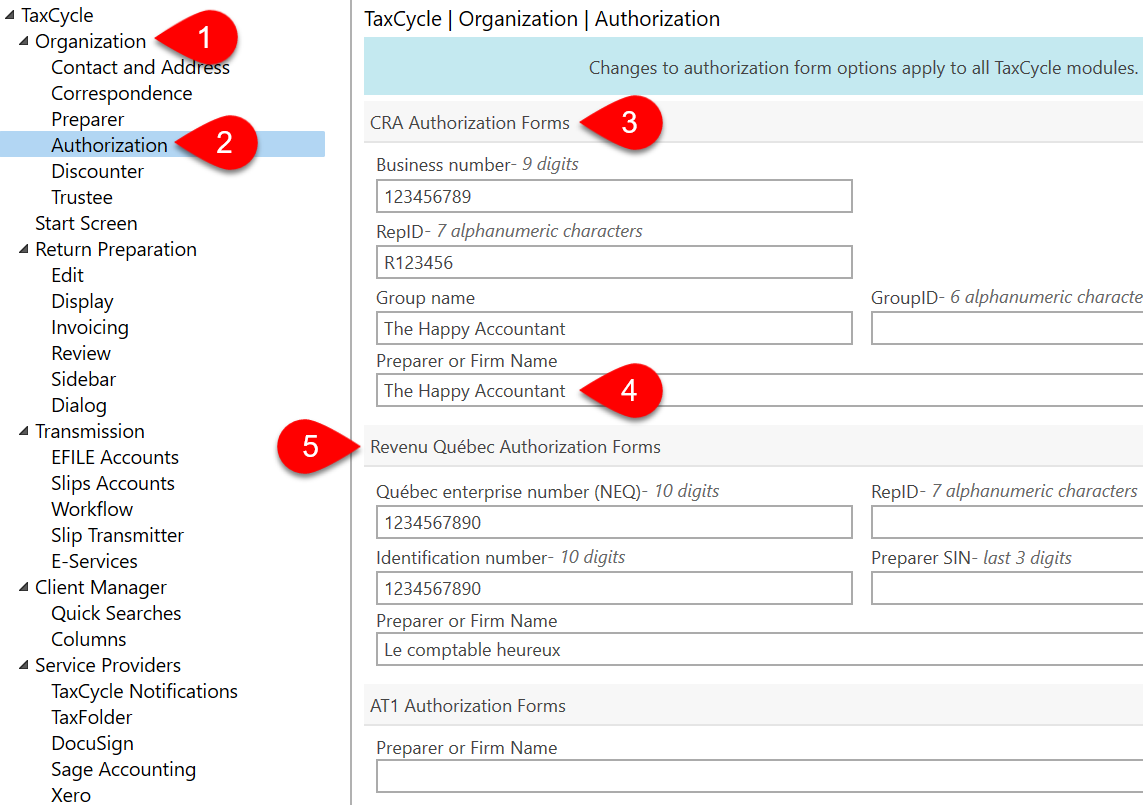
- Expand the Organization section in Options.
- Click on the Authorization page. (Changes to authorization form options apply to all TaxCycle modules.)
- In the CRA Authorization Forms section, enter your firm’s Business number, RepID, Group name and GroupID, as required. TaxCycle inserts these details into the Engagement worksheet when you create a return. From there, they flow to the AuthRep and AuthRepBus worksheets. Read the AuthRep Authorization/Cancellation Request and AuthRepBus Business Authorization/Cancellation Request help topics to learn more.
- If you need to use a different Preparer or Firm Name on these authorization forms, enter that name here. TaxCycle inserts this second name in the appropriate field in the Preparer/Firm representative section of the Engagement worksheet.
- If you’re preparing returns for Québec, complete the similar fields under the Revenu Québec Authorization Forms section for the MR-69 form. Read the Québec MR-69 Authorization help topic to learn more.
3. EFILE Number and Password
Enter your electronic filing credentials now so you’re ready for filing when systems open.

- Expand the Transmission section in Options.
- Click on the EFILE Accounts page and enter your EFILE Number and Password. These credentials allow you to use many of the CRA’s electronic filing services, including T1 EFILE and T2 Corporation Internet Filing. See EFILE and Electronic Services Available in TaxCycle for a full list.
- If you need to file returns with NetFile Québec, enter those transmission credentials on this page.
- For slips returns and other return types that you can upload to the CRA by Internet file transfer (XML), complete the Slips Accounts page. If you’re filing RL slips with Revenu Québec, you can also set up your Québec transmitter number and transmitter ID on this page. Learn more in the Internet File Transfer (XML) and Internet File Québec Relevés help topics.
4. Default Folders
Review default file locations at the beginning of tax season to make sure they point to the correct folder on your computer or network. Setting the correct path(s) means you won’t waste time browsing for files.
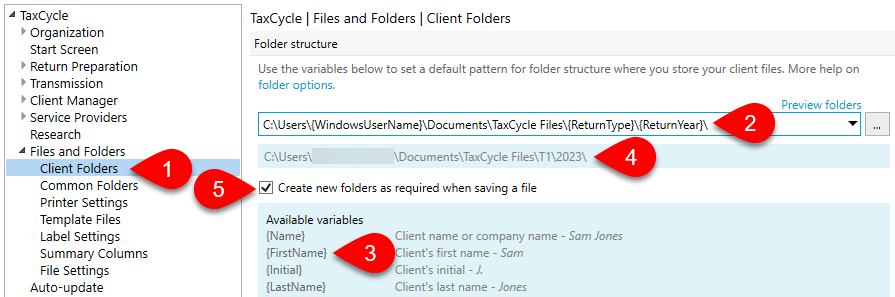
- In Options, expand Files and Folders, then click on Client Folders.
- In the Preview folders field, enter a path with variables to define a hierarchy and naming convention for your folders. Use a backslash to separate parent folders from child folders.
- On first install, this path points to your Windows® Documents folder and organizes the folders by return type and year:
C:\Users\{WindowsUserName}\Documents\TaxCycle Files\{ReturnType}\{ReturnYear}.
- For files stored on a local computer, in a folder not shared with others, use a drive letter in the path:
C:\server\Tax Returns\{ReturnType}\{ReturnYear}.
- For files stored on a shared server, use the server name, preceded by two backslashes:
\\server\Tax Returns\{ReturnType}\{ReturnYear}.
- Your path can include any items from the list of Available variables. Enclose variables in single braces { } (curly brackets). A list of variables appears in the blue box on the options page.
- An example of your proposed folder structure appears under the field to help you see the results of the variables. If you have a file open, it uses the data from that file to show a preview.
- Check Create new folders as required when saving a file to build the folder structure as you save tax returns.
For more information on the available variables, sample folder structures, and setting exceptions, read the Folder Options help topic.
The Client Manager also uses these locations as default folders to monitor for new files and changes to files. If you change these locations after setting up the Client Manager, be sure to update your monitored folder locations. See the Indexing and Monitored Folders help topic.
5. File Naming
For each tax module and year, you can set a default file name format of all new TaxCycle files you create or carry forward.
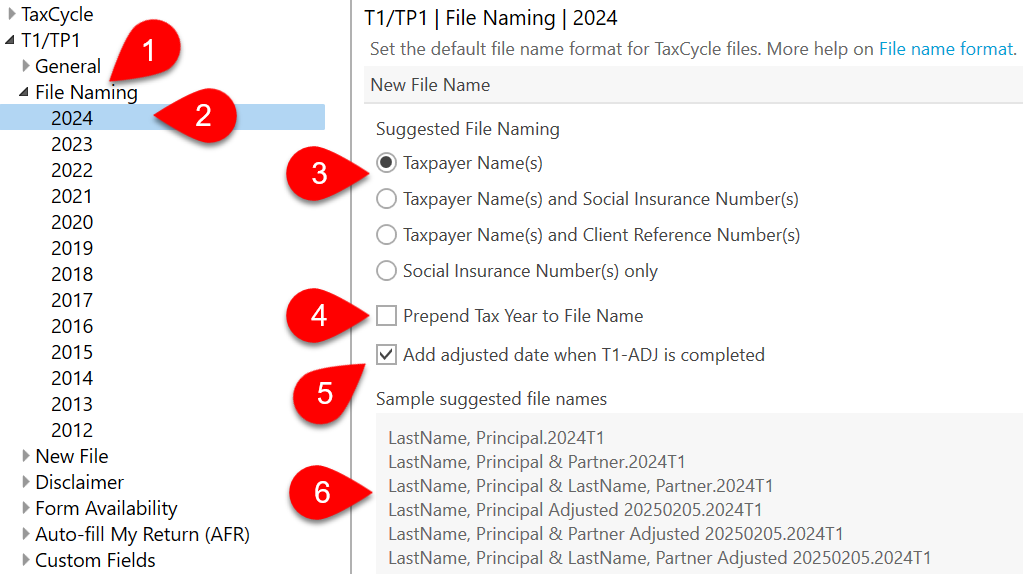
- In Options, expand the T1/TP1 section (or another tax return type) and click on File Naming to apply the settings to all years.
- To set separate options for each year, expand File Naming then click on a year.
- On the right, set the contents and order of suggested files names, including the taxpayer name, tax year, social insurance number, business number.
- Choose whether to add the Tax Year to the beginning of the file name.
- For adjusted returns, choose whether to add the adjusted date to the end of the file name when completing the T1-ADJ form.
- A sample of the proposed file name format appears at the bottom of the page.
6. New File Options
For each tax return type or module, you can set defaults to insert in fields when creating a new file or carry forward one from the prior year. It’s worth reviewing these options even if you have already carried forward your files to the current year.
Set defaults for the following:
- Optional carry forward values, such as whether to carry forward answers to the Elections Canada and Foreign Property questions.
- Client city and province in the address for new files.
- Goals and thresholds for optimizations.
- Language of correspondence.
- Contact method for pre- and post-assessment.
- Default amounts for Old Age Security (OAS).
- Settings for the Canada Works Benefit and Canada Carbon Rebate.
- Signing dates.
- Fields on AuthRep, AuthRepBus and MR-69 authorization forms.
- Selections on the T183, TP-1000, T1135 forms.
- Instalment payment settings.
Usually, TaxCycle also displays a Quick Fix review message if the details in the tax return do not match those set in Options.
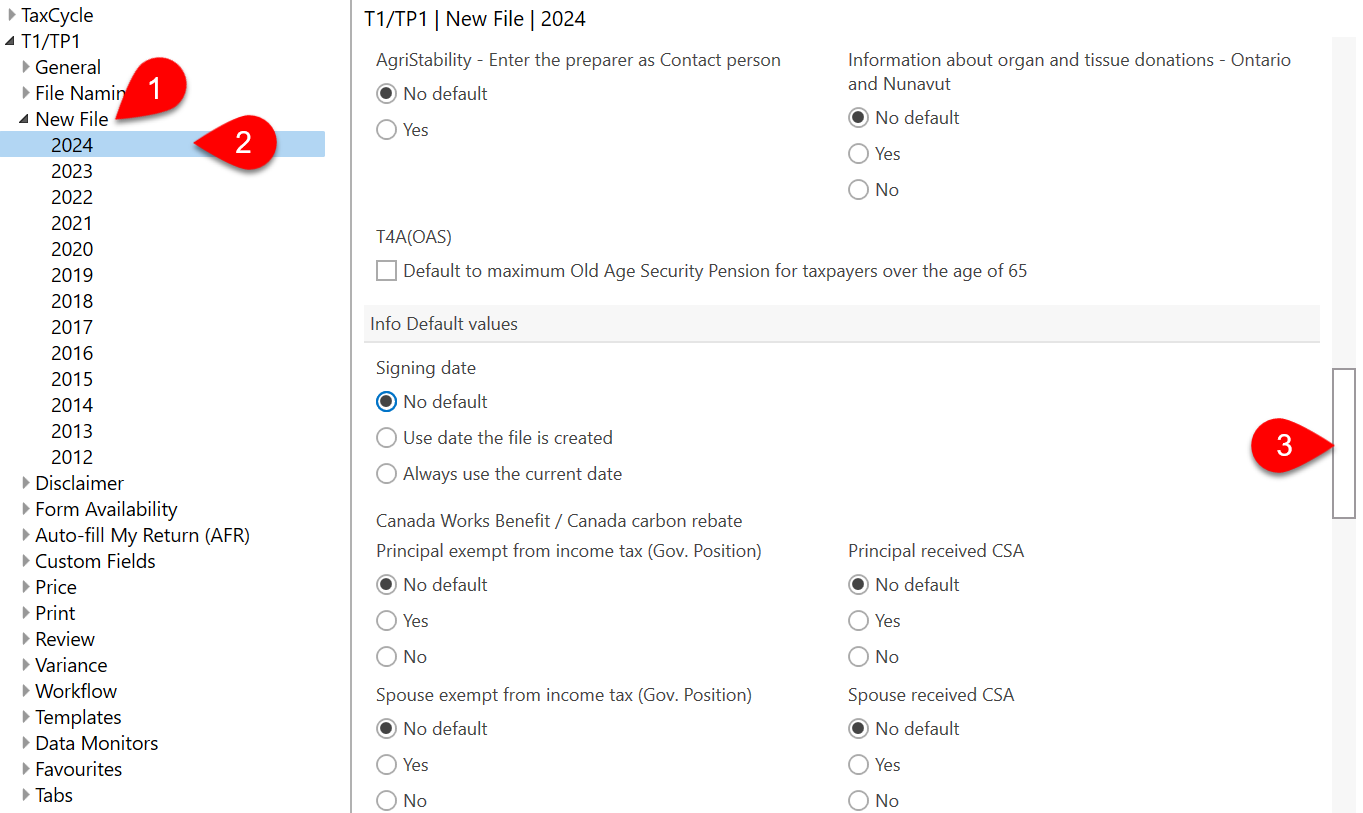
- In Options, expand the T1/TP1 section (or another tax return type) and click on New File to apply the settings to all years.
- To set separate options for each year, expand New File then click on a year.
- Scroll through the list on the right to set defaults.
7. Print Sets
TaxCycle comes with default print sets that meet the needs of most practices. However, you can make changes to these print sets or create as many sets as you need.
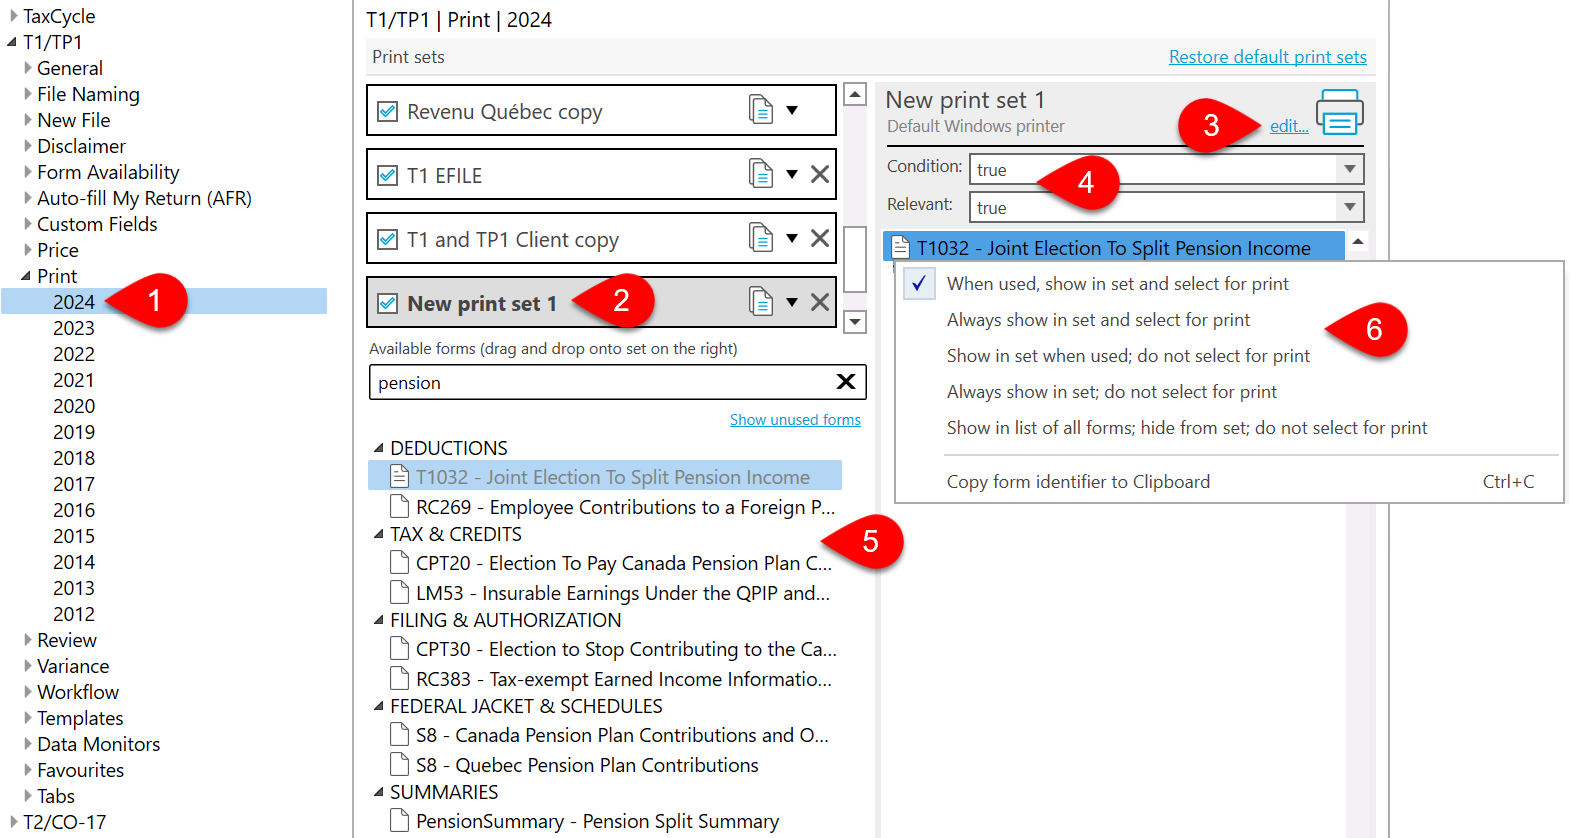
If you’re using TaxFolder or DocuSign® to request electronic signatures, we recommend creating a print set for the T1032, Joint Election to Split Pension Income. The CRA requires signatures from BOTH the transferring and receiving spouses/partners on the same form. This becomes a problem if you print the form as a part of the Client Copy print set AND print that print set for each person. TaxCycle will send the form to both people in the couple and requires both people sign both forms, duplicating the effort. This is easy to fix by creating a separate print set for the T1032 and removing the T1032 from the Client Copy print set. For step-by-step instructions, read the E-signatures on Form T1032 (Pension Splitting) help topic.
To edit or create print sets, see the Print/PDF Options help topic.
- In Options, expand the T1/TP1 section (or another tax return type), then expand Print and click on a year.
- Click once on a print set to edit it. Scroll down to the bottom of the list to create a new set.
- Click the Edit link to change the printer and output options. See the Printer and PDF Output Options help topic for the full list of settings.
- Each print set has a relevance condition that tells TaxCycle when to show the print set in the Print sidebar and a condition that tells TaxCycle when to check it for print sidebar (true means always show it). Some common conditional statements appear in the drop-down menu but you can write a new one using field codes.
- Drag and drop forms between the two columns to change the form selection for the print set. Available forms show in the left-hand column and forms included in the set in the right-hand column.
- Right-click on a form in the set to indicate when to show or select a form for print.
8. Prices and Invoicing
Use TaxCycle to create invoices based on the forms used or on the time spent working on the file. The information entered in Options flows to the Billing worksheet in the tax return. From there, it flows to the CInvoice, JInvoice and FInvoice templates.
Learn how the Billing worksheet and invoice templates work in the Billing and Invoicing help topics.
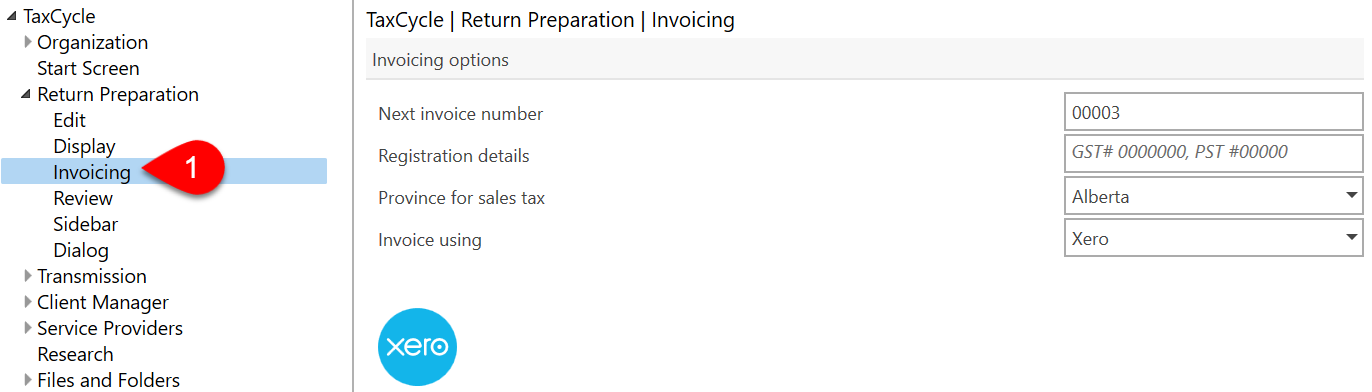
- Expand the Return Preparation section and click on Invoicing to insert the GST/PST number and the province for sales tax. See the Invoice Options help topic. If you use Xero to invoice your clients in your practice, you can connect to your organization and export your TaxCycle invoices to Xero (or QuickBooks®).
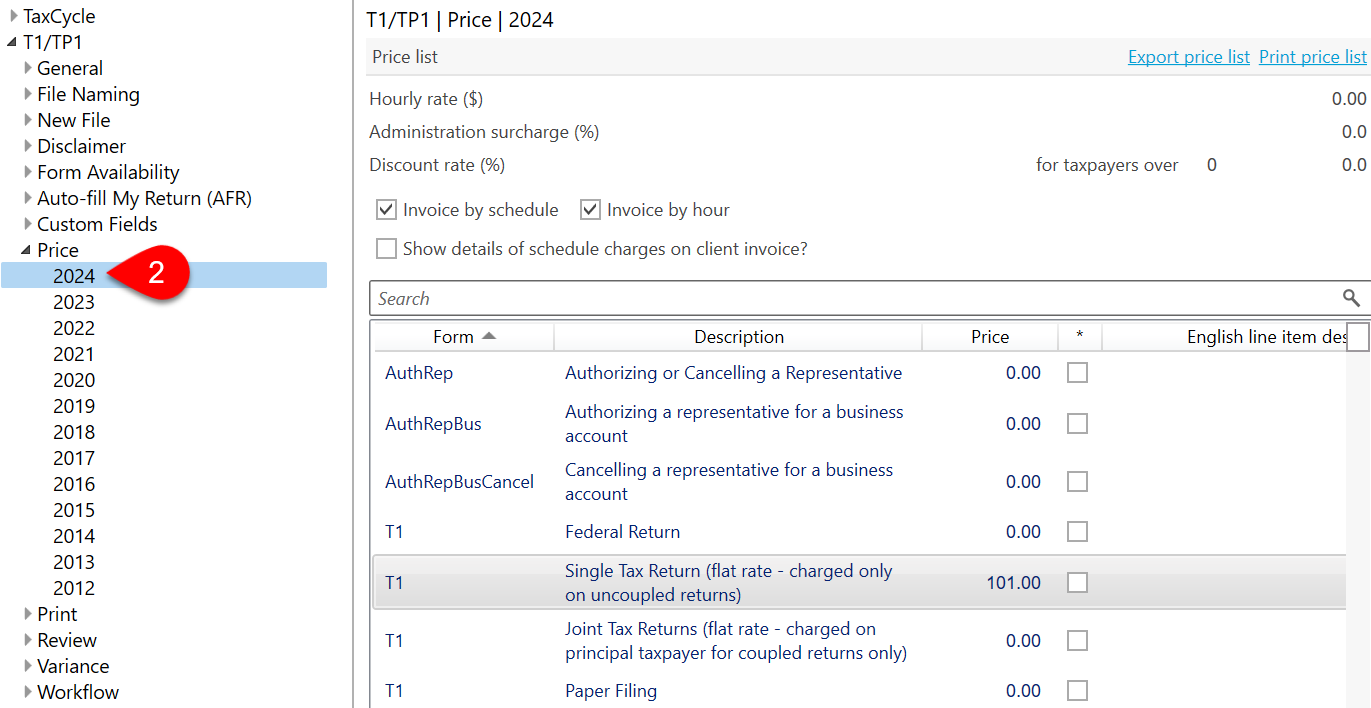
- To set prices for a module, expand the section for T1/TP1 (or another tax return type) and click on Price to apply the settings to all years. To set separate options for each year, expand Price and click on a year. On this page, you can set hourly rates or bill by form or item. See the Price Options help topic.
- By default, the Client Copy print set contains both the CInvoice (client invoice) and JInvoice (joint client invoice) but TaxCycle only automatically selects the CInvoice for print. You can change the template and print conditions to select the JInvoice automatically when it applies. Learn how in the Invoice Templates help topic.
9. Workflow Groups and Tasks
TaxCycle includes tasks and groups to help you track the progress of a return for each person in the file. In Options, you can customize TaxCycle to match your practice workflow. You can set required tasks, reorder, show or hide the tasks and groups in the file information.
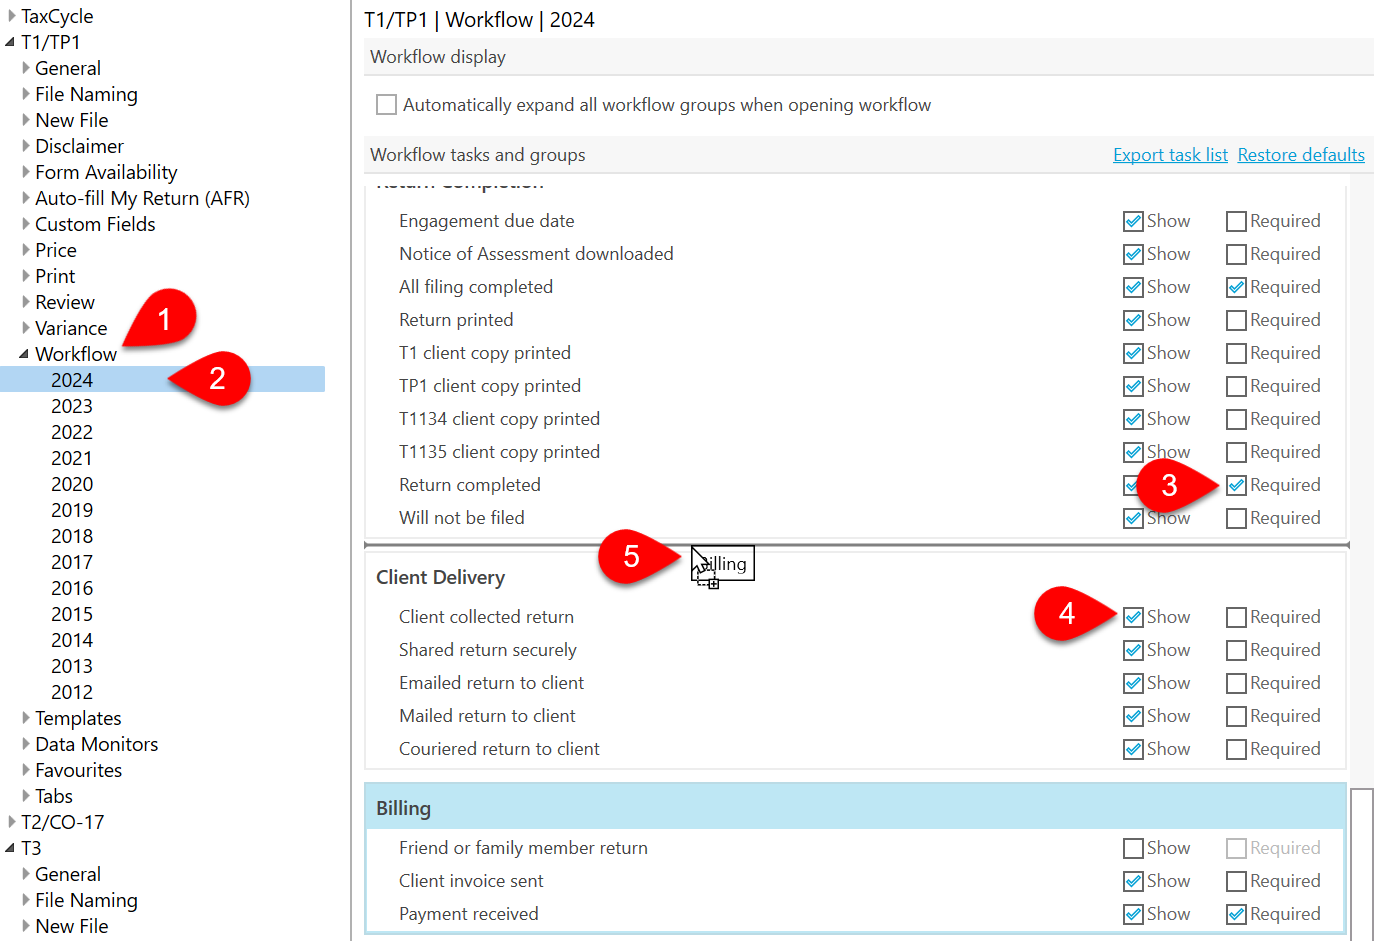
- In Options, expand the T1/TP1 section (or another tax return type) and click on Workflow to apply the settings to all years.
- To set separate options for each year, expand Workflow and click on a year.
- Check the Required box if the task must be checked to consider the group completed. If all the tasks within a group are optional, checking one task within the group in file information marks the entire group as complete.
- Clear the Show check box to hide a task.
- Drag and drop groups to change the order in which they appear. Drag and drop to reorder tasks or move them to a different group. (If a group contains no tasks, it won’t show in the file information.)
For detailed instructions, see the Workflow Groups and Tasks help topic.
10. Options Profiles
Options Profiles allow you to save your options in a zip file that you can share with your office or use as a backup. Save some or all options pages to the profile. Create as many profiles if you need.
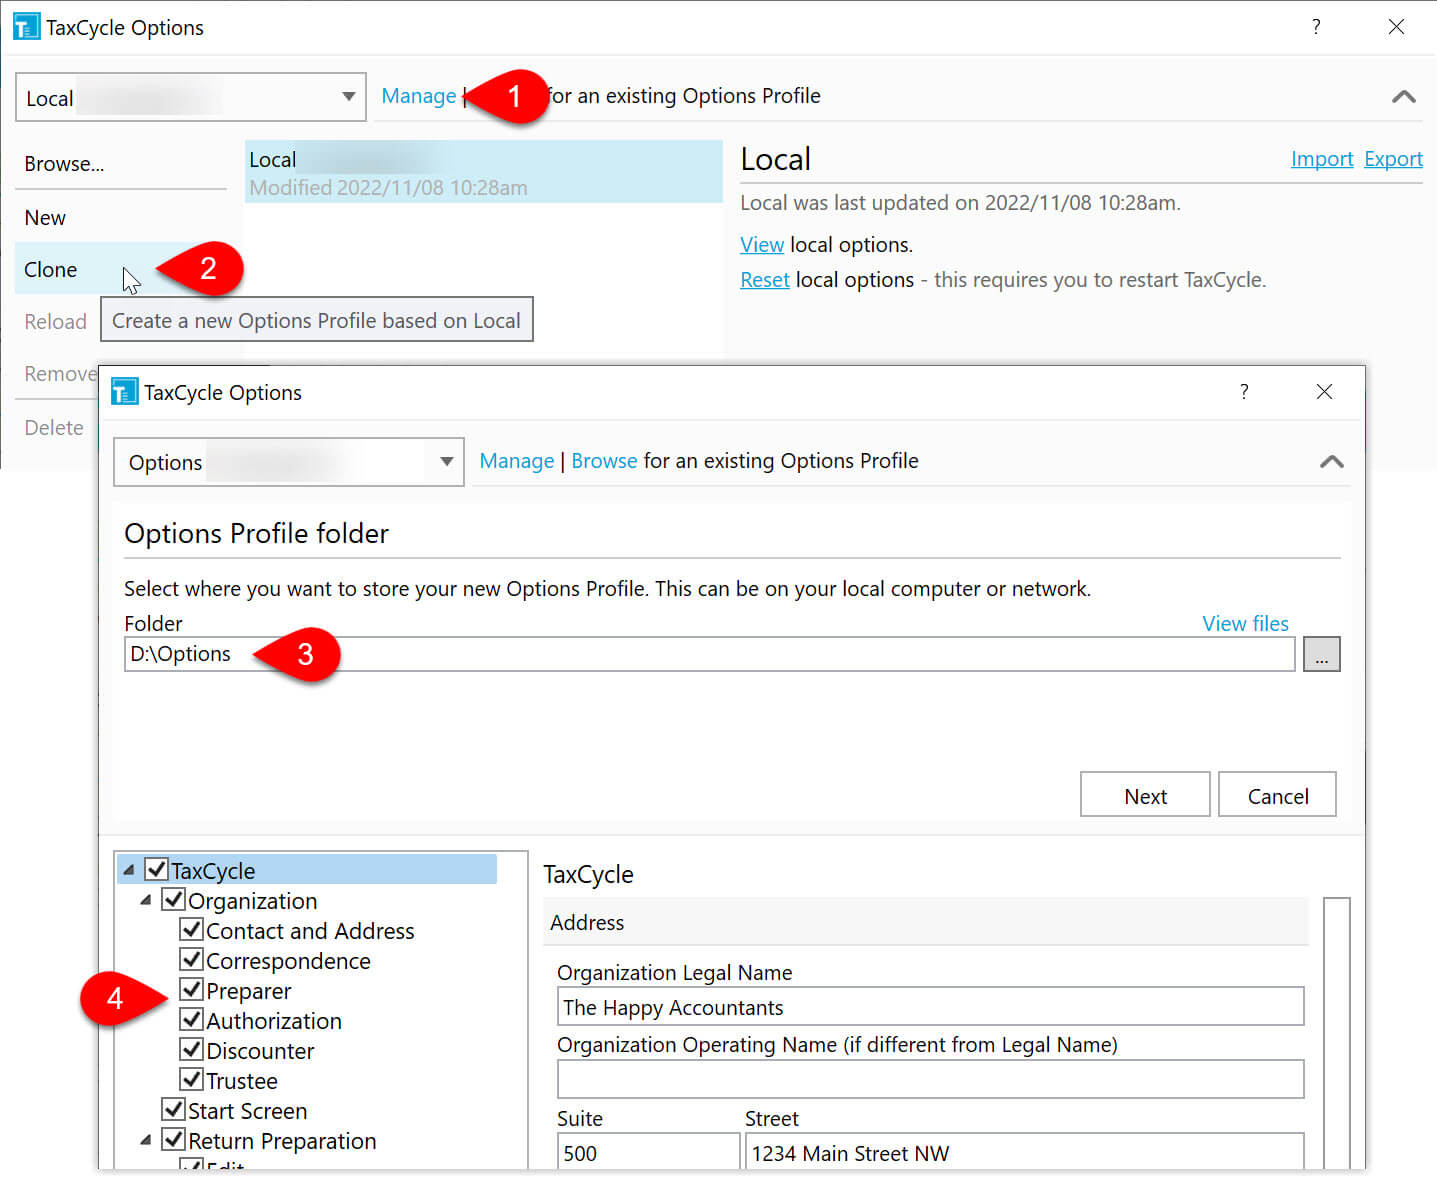
- Click on Manage to expand the Options Profile section.
- Click once on your Local profile, then click Clone to use it as a starting point.
- Follow the steps to name and save the profile. If you plan to share the profile on the network, be sure to create the path with a UNC path. For example, \\minicomputer\sharedfolder. You can also save the file to a shared folder in Dropbox, Microsoft OneDrive or Google Drive.
- Check Options pages to include in the profile.
- Choose whether to create an email to send to your team and click Create to complete the profile.
For step-by-step instructions, see the Options Profiles help topic.