AuthRepBus Business Authorization/Cancellation Request
TaxCycle T1, T2, T3 and T5013 all support electronic filing of requests to obtain or cancel authorization to represent a business with the Canada Revenue Agency (CRA). Representatives must have authorization on file to download and view information about their business clients from the CRA.
Authorization Forms
- AuthRepBus (formerly RC59)—Complete this worksheet to transmit consent for online access to a business account. Your client must sign and date this form before you can submit the request electronically. You can request an electronic signature on this form. You must keep this signed form on file for six years from the transmission date. Do not send it to the CRA unless requested to do so. TaxCycle does not transmit the details on this form when filing the T2 return.
- AuthRepBusCancel (formerly RC59X)—Use this worksheet to cancel authorization of a previous representative. Your client must sign this form before you can transmit it. You can also request an electronic signature on this form.
- The CRA no longer accepts forms RC59 (Business Consent for Offline Access) and RC59X (Cancel Business Consent or Delegated Authority). The CRA has replaced these forms with AUT-01 (Authorize a Representative for Access by Phone and Mail) and AUT-01X (Cancel Authorization for a Representative), included in TaxCycle Forms. Note that if you submit this form to request offline access for any of your existing clients, you will lose online access to their accounts.
Authorization Options (RepID, GroupID)
Enter defaults required for the completion of authorization forms in options.
- To open options, go to the File menu, then Options. Or, if you are on the Start screen, click Options in the blue bar on the left.
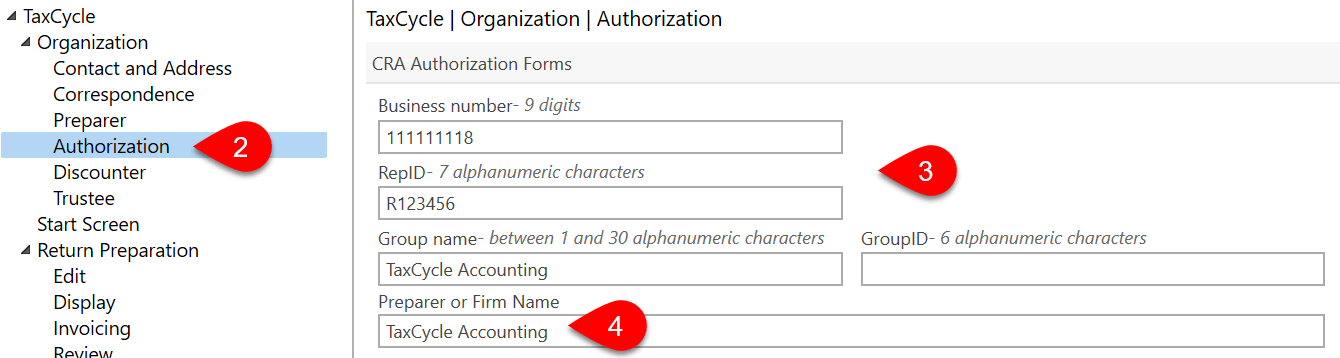
- On the left, expand the Organization section and click on the Authorization page.
- In the CRA Authorization Forms section, enter your firm’s business number, RepID, Group name and GroupID, as required. TaxCycle then enters these values on the Engagement form when you create or carry forward a file. It also triggers a review message if the form does not match the default set in options.
- If you need to use a different Preparer or Firm Name on these authorization forms, enter that name on the page. This information then flows to the related field in the Preparer/Firm representative section on the Engagement worksheet.
EFILE Number and Password
To file electronically with the CRA, you must have an EFILE number and password:
- To register for EFILE and receive these credentials, go to the CRA's EFILE for electronic filers page.
- If you already have an EFILE number, you must complete a yearly renewal to receive a new password for the latest T1 tax season. Always use the latest password given to you.
The registration or renewal process includes a suitability screening. This process may take up to 30 days. To allow enough time for the review of your application before the filing season starts, we encourage you to renew your application as soon as possible.
Enter the CRA EFILE number and password in TaxCycle options:
- If you have a file open, go to the File menu, then click Options. To open Options from the Start screen, click Options in the blue bar on the left side. (You can also access these EFILE options any time by clicking on the wrench icon in the Transmit sidebar.)
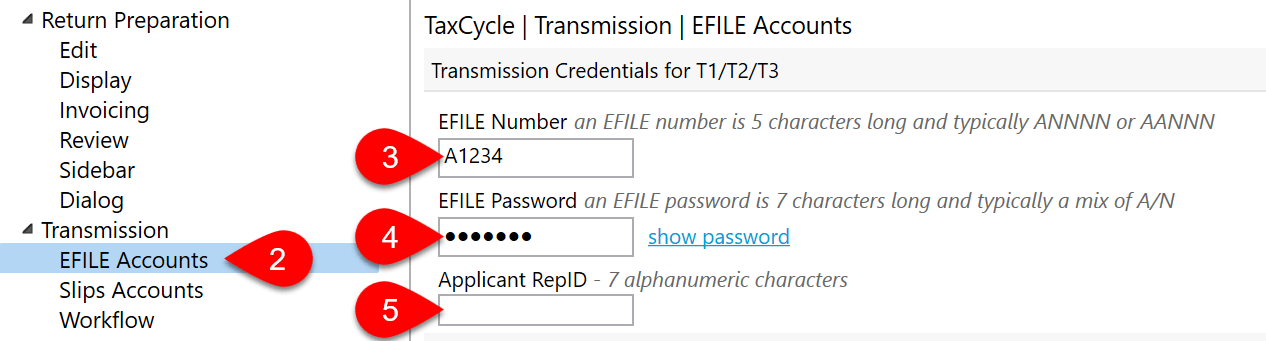
- On the left side of the screen, expand Transmission, then click on EFILE Accounts.
- Enter your CRA EFILE Number.
- Enter your current CRA EFILE Password. (As soon as you renew your account, you can use it to transmit returns.)
- (Optional) Enter your CRA RepID. This field is optional for the 2023 filing season; leave it blank if you do not have a valid RepID within the list of EFILE applicants.
New File Default Values
In options, you can also see the default values for fields on the AuthRepBus and AuthRepBusCancel worksheets. TaxCycle then enters these values on the form when you create or carry forward a file. It also triggers a review message if the form does not match the default set in options.
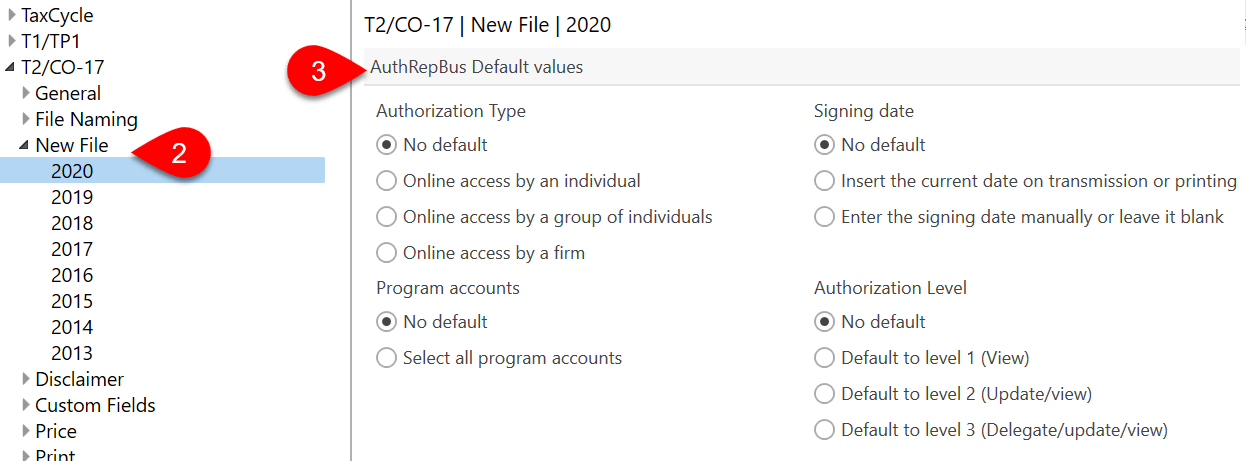
- From the Start screen, click Options in the blue bar on the left side. If you have a file open, go to the File menu, then click Options.
- On the left, expand T2/CO-17 and click on New File to apply the settings to all years. To set different options for a specific module, expand the section and click on a module.
- On the right, scroll until you see the section for AuthRepBus Default values and set the defaults for the Authorization Type, Program Accounts, Signing Date and Authorization Level.
- Click OK or Apply to save your changes.
Select an Authorization Type
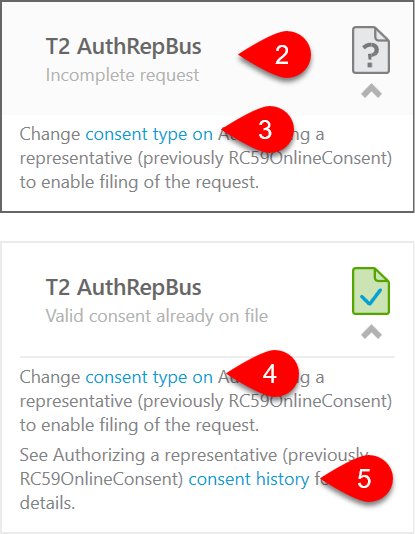
In TaxCycle T2, look for the T2 AuthRepBus status in the Transmit sidebar.
- Click Transmit in the sidebar or press F12.
- Click once on the T2 AuthRepBus box to see details of the status.
- If the AuthRepBus worksheet is incomplete, click the link to change the consent type on the worksheet.
- If the selection on the worksheet indicates that a valid authorization is already on file with the CRA, the box will show this. If you believe this is incorrect, click the consent type to change it on the worksheet.
- You can also jump to the consent history on the AuthRepBus Results worksheet.
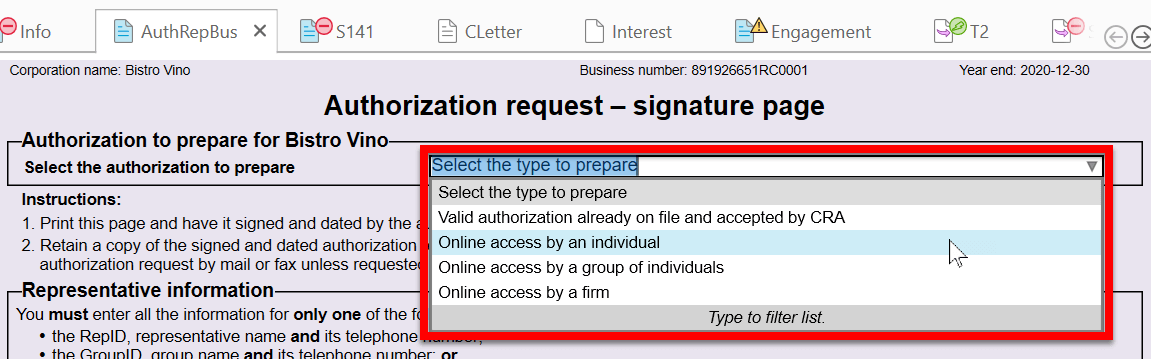
At the top of the AuthRepBus worksheet, select the type of authorization you are requesting. The answer you choose determines which information you must enter on the form and what types of services you can provide to your clients.
 Valid authorization already on file and accepted by CRA
If you already received authorization in prior years or through some other way, select this option.
If you previously submitted an authorization request using TaxCycle in the prior year and then carried forward the return, TaxCycle automatically selects this option.
If you use the CRA T2 Auto-fill service and it returns results (because you already have the authorization to access the client’s file), TaxCycle will automatically select to this option.
Online access by an individual automatically inserts your RepID and preparer contact information. This information flows from the Engagement worksheet. Online access by a group of individuals automatically inserts your GroupID and contact information. This information flows from the Engagement worksheet. Online access by a firm automatically inserts your Business Number and contact information. This information automatically flows from the Engagement worksheet.
Level of Authorization and Expiry Date
Set the level of authorization requested on the AuthRepBus.
- Level 1 allows the CRA to disclose information to you on the program accounts.
- Level 2 allows the CRA to disclose information to you on the program accounts and to accept changes to the accounts from you.
- Level 3 allows you to delegate authority and makes changes to the representatives on the accounts, as well as allowing the CRA to disclose and accept changes.
Unless you enter an expiry date, the authorization remains in effect until the taxpayer or the representative cancels it.

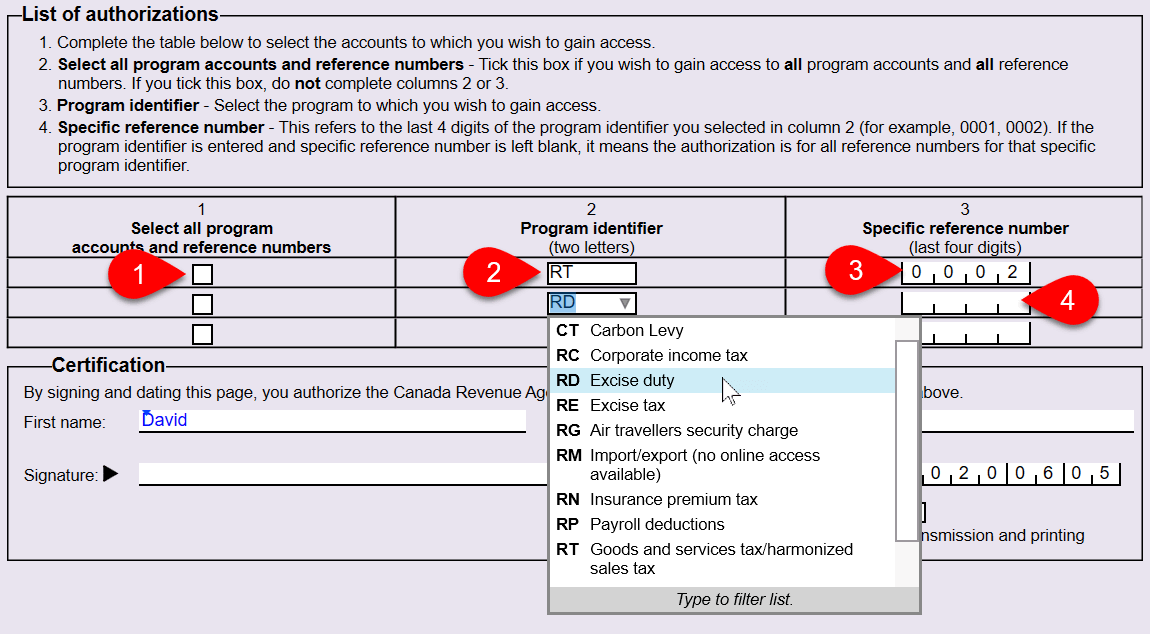
List of Authorizations
Indicate which program accounts you need to access:
- Check the box in column 1 to gain access to all program accounts and reference numbers. Do not complete column 2 or 3.
- Select a program identifier from column 2 to gain access to a specific program—payroll or GST, for example.
- Enter a reference number in column 3 to gain access to a specific reference number for the program selected in column 2.
- This table allows multiple rows, so you can complete more rows to gain access to more than one program or reference number.
Set the Signing Date
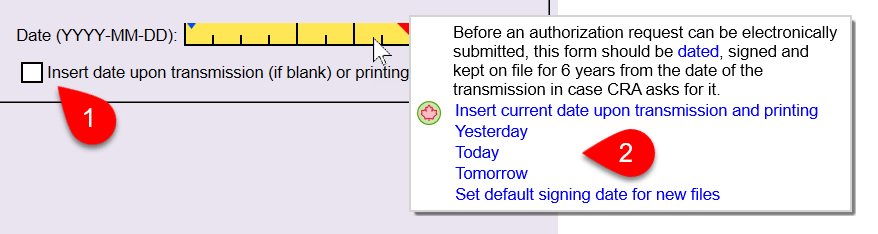
Depending on what you set in New File options, TaxCycle may already have set the signing date on the AuthRepBus worksheet.
- If you selected Insert current date upon transmission or printing in options, TaxCycle checks the box near the signing field on the AuthRepBus worksheet. Then, when you print or electronically file the form, it inserts the date.
- If you selected No default or Enter the signing date manually or leave it blank in options, TaxCycle will show a Quick Fix review message.
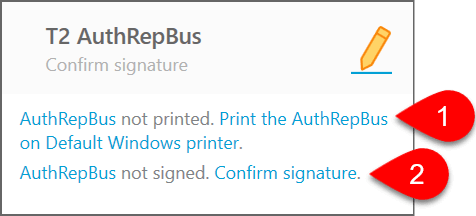
Confirm Signature
The CRA requires that your client sign the AuthRepBus worksheet before a preparer electronically files the form. It is also important that you keep this signed form in your files for six years, in case the CRA asks for it.
By default, TaxCycle requires you confirm the taxpayer has signed the form before you can transmit. Do this from the Transmit sidebar.
- Click Print the AuthRepBus link to print the form on the printer configured for single-form printing. This opens the Print/Generate forms dialog box, where you can change the printer/output settings. You can request use the AuthRepBus Cover Email to request an electronic signature. TaxCycle records the date and the name of the person who printed the form.
- Once you have the signed form on file, click the Confirm signature link. TaxCycle records the signing date and the name of the person who confirmed the signature.
You can disable the signature confirmation step. This skips the confirmation step but you will still see links to print and optionally confirm the signature before transmitting. To learn how to do this, read the Transmission Options help topic.
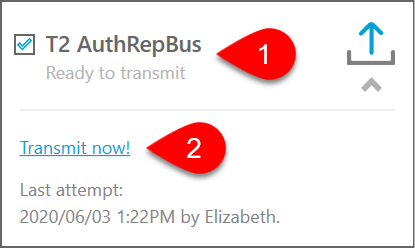
Transmit the Authorization Request
- Once you confirm the signature, the form is Ready to transmit.
- Click the Transmit Now! link to begin the transmission.
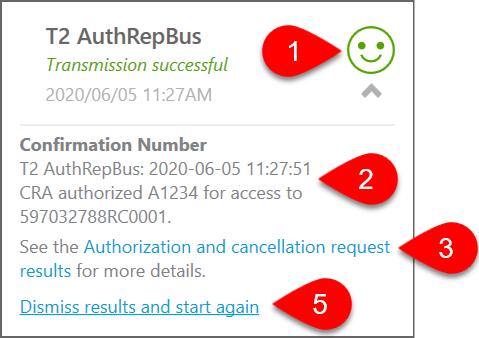
Transmission Results
- Upon successful transmission, you will see, the words Transmission successful in green text and green happy face. This is the same symbol that appears in the Client Manager for successful transmissions, and it also appears (white on blue) in the blue bar at the bottom of the window of any open tax return, so you can quickly see the current status.
- The box also shows the date and time of the transmission and a summary of the authorization. (The CRA does not provide a unique confirmation number.)
- Click the Authorization and Cancellation Transmission Results link to view the worksheet which contains a full list of the results from all transmission attempts.
- If the CRA rejects authorization transmission with errors, you will see the words Transmission rejected and a red sad face.
- To attempt transmission again, click Dismiss results and start again.
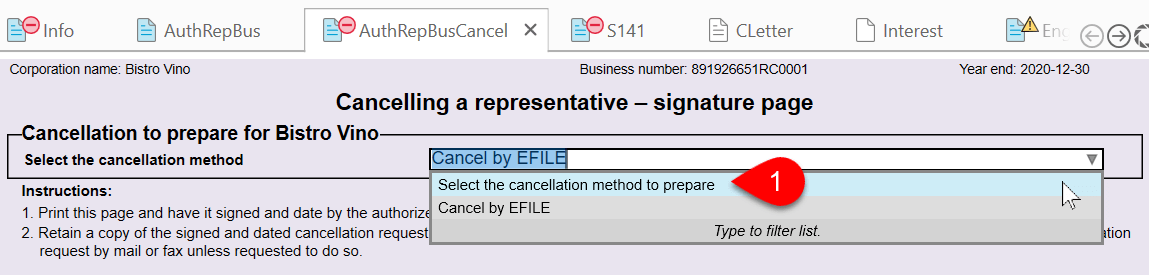
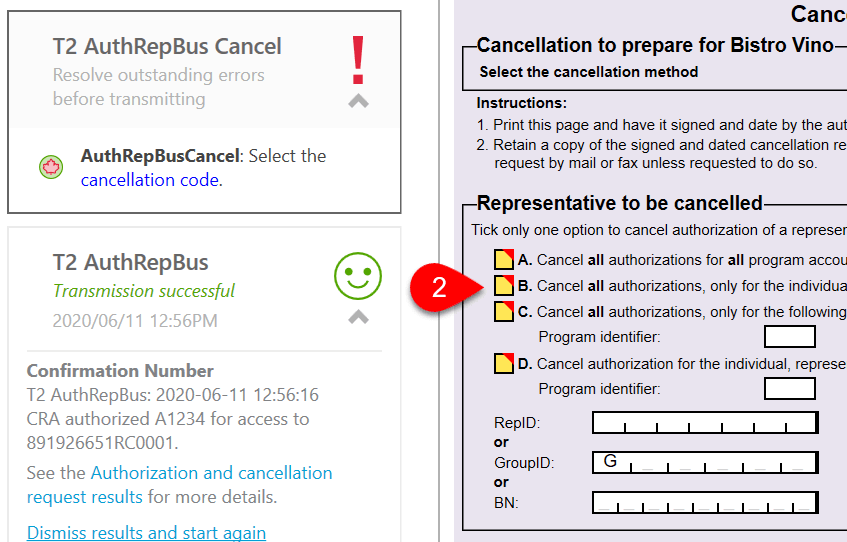
Cancel a Representative
To cancel a representative, complete the AuthRepBusCancel form. You can use the form to cancel all representatives or all programs for a business, or to cancel a specific program, reference number, RepID, GroupID or Business Number.
- Select Cancel by EFILE at the top of the form. A new T2 AuthRepBus Cancel box appears in the Transmit sidebar. Follow the steps in this box to file the form. (They are similar to filing an AuthRepBus request, above.)
- Check a cancellation code on the AuthRepBus Cancel form to indicate which authorizations to cancel for which representatives.
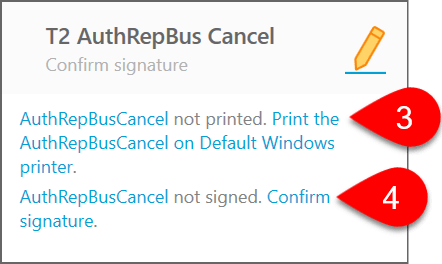
- Print the form or obtain your client's signature (or electronic signature).
- Confirm receipt of the signature in the Transmit sidebar.
- Click Transmit now! to send the form.
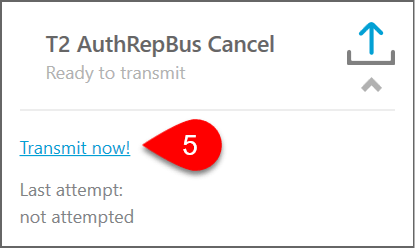
- The CRA will return results from the transmission. Please note that the CRA does not return a unique confirmation number for successful transmissions. Instead, it appears as a time stamp upon receipt of the form.
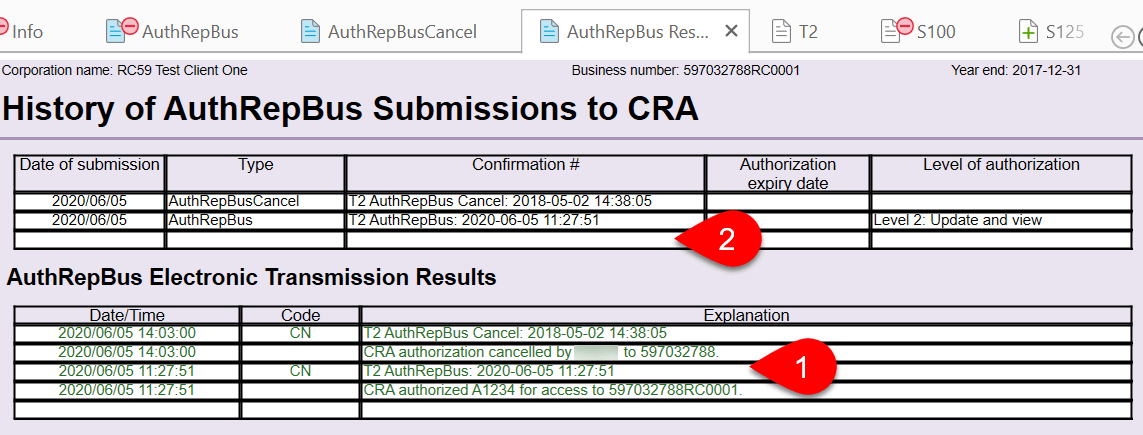
AuthRepBus Results Worksheet
- The AuthRepBus Results worksheet lists the results of all attempts to request or cancel authorization. TaxCycle carries forward these values year-over-year, so next year you can review which consents you have on file and which need updating. This information also appears in the Consent section on the Engagement worksheet.
- In the table at the top of the worksheet, you can also manually enter the consent history from past years if you wish.
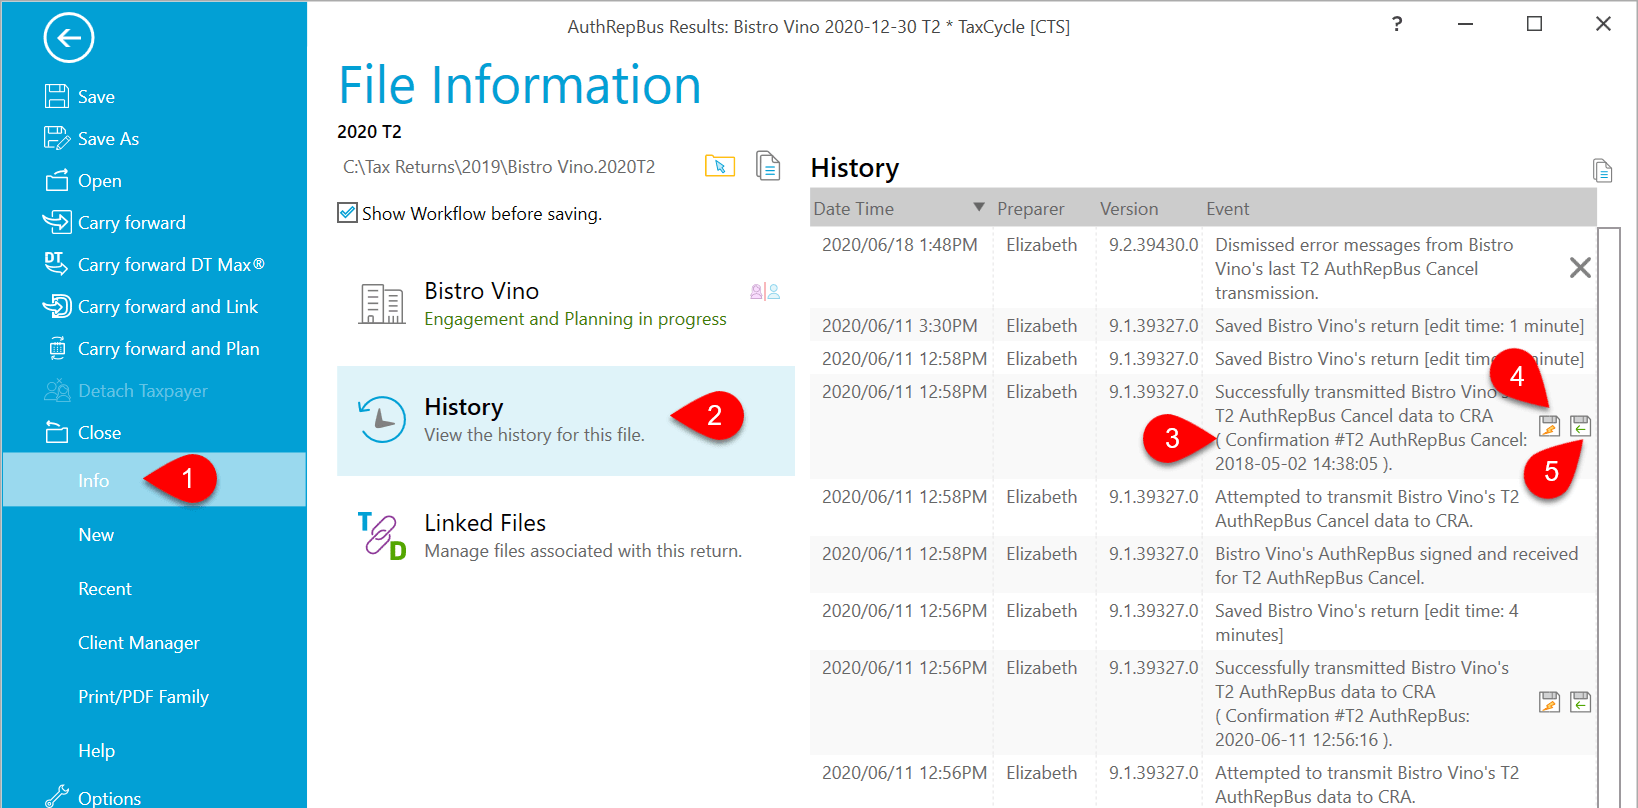
Transmission history
The file history records each transmission attempt:
- Go to the File menu, then click on Info.
- Click on History.
- Find the record of the transmission.
- Click the first save button (the one with the lightning bolt) to save a copy of the XML file as transmitted to the CRA.
- Click the second save button (the one with the green arrow) to save a copy of the response sent back from the CRA.
- TaxCycle also updates the workflow information for the taxpayer. (See the Workflow Groups and Tasks help topic.)