Updated: 2020-07-20
DoxCycle automatically classifies many types of documents. It analyses the contents of the document to determine which type to assign, matching the document against the criteria set when DoxCycle is installed. Obviously, the scope of documents you can add to DoxCycle far exceeds the classifications we include by default. We can only work from the sample of documents we have while creating DoxCycle.
You can “teach” DoxCycle to classify almost any type of document you import or scan in your office. Assign the type, then add the document to the classifier.
How does the DoxCycle Classifier “learn”?
When you add a document to the classifier (see below), DoxCycle stores information about the document and relates it to the document type you assigned. The information may include words on the page, layout of the document, and more. The classifier uses this information to analyse new documents and automatically assign a type. (Beware that sensitive information from the document may be stored during this process.)
When automatically assigning a type, the classifier weighs characteristics of an individual document against what it knows about all the document types. When the classifier calculates a “probable match” with one of those types it assigns the type.
By adding a document to the classifier, you are affecting the weight of the recognized characteristics and the calculation for matching documents. It modifies the probability that the document you added will be recognized, but it also affects the probability of recognizing other document types.
Tips for building a reliable classification
- Have patience and let DoxCycle build the classification “naturally.” For best results, add new documents to the classifier as you receive them and stop adding a document type to the classifier once DoxCycle automatically recognizes it.
- You will need to add a document (or similar documents) to the classifier at least two (and possibly more) times before DoxCycle will automatically classify similar documents. It may take multiple instances to “learn” the criteria for automatically assigning documents to a type.
- Do not try to force a classification by repeatedly adding the same document to the classifier. Adding the document too many times can “over-weight” it in relation to other documents, affecting classification of other documents that share similar features.
- The classifier can’t read your mind. It depends on what is on paper. Do not try to split similar documents that have few distinguishing features into separate types. For example, if you add a receipt for a flight to the “Business Travel” type and then a very similar receipt to the “Vacation” type, the classifier will likely not have enough information on the documents to detect a reliable difference between the two.
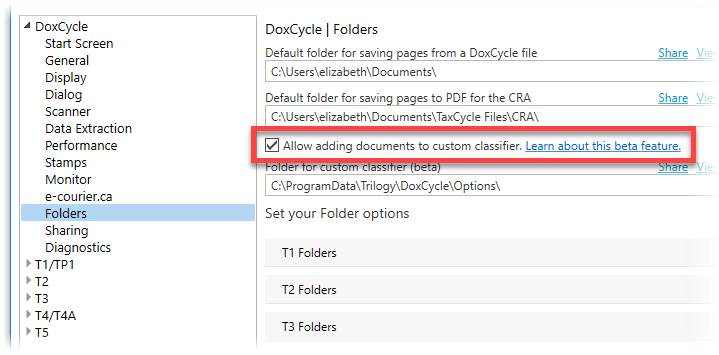
Enable adding documents to the custom classifier
A check box on the Folders page in options allows you to enable or disable adding documents to the classifier. By default, this option is disabled.
Checking this box adds Add to classifier to the right-click menu in the index and a similar check box to the classification assistant.
Add a document to the DoxCycle Classifier
- Scan or import a new document (or documents).
- The document will either appear as an existing document type or as Unclassified.
- Assign the correct document type using the Page Assistant, the Classification Assistant, or by dragging and dropping it onto the right type. If the type you need doesn’t exist, add a new document type to the document outline, first (learn how to do this in the Custom Document Outlines help topic.)
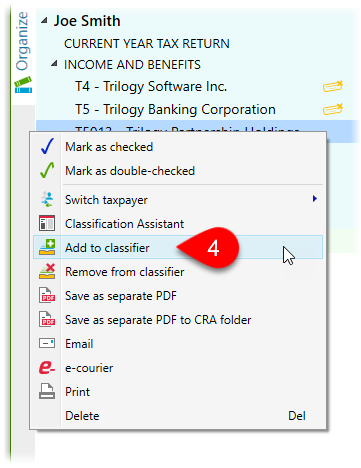
- Once a document has the correct type assigned, right-click on it in the sidebar and select Add to classifier. (You can also select multiple documents before you right-click to add them all to the classifier at the same time.)
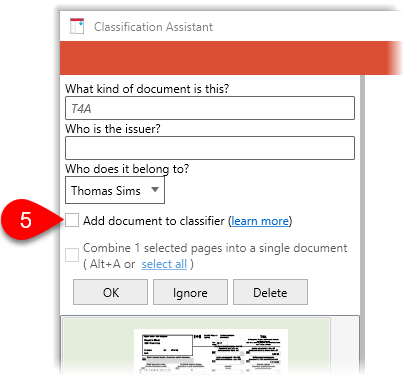
- You can also check the Add document to classifier box in the Classification Assistant:
Classify documents by file name
If you regularly import documents of this type with a specific file name, you can configure DoxCycle to recognize the document using a file name.
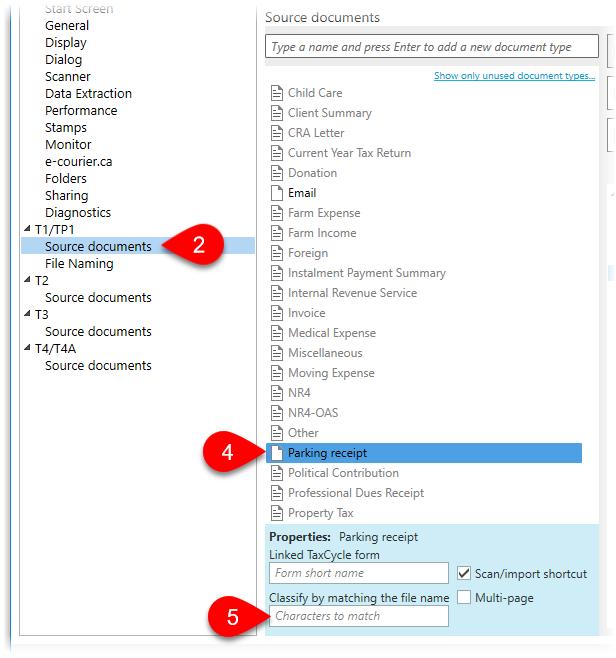
- To open Options from the Start screen, click Options in the green bar on the left side. If you have a file open, go to File menu, then click Options.
- On the left side of the dialog box, expand the T1/TP1 section, and click on Source documents. (To adjust T2/CO-17 outlines, expand T2.)
- Click on a document outline.
- Click on the document type in the list. (Or, create a new document type using the field in the list.)
- In the Classify by matching file name field, type the portion of file name used for matching it to the document type.
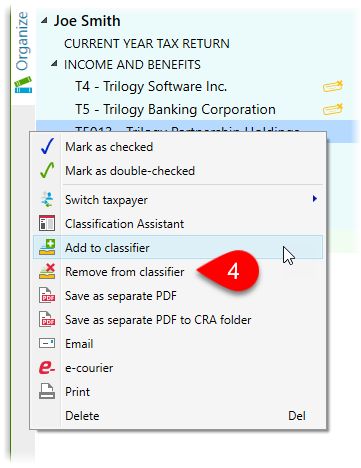
Remove a document from the DoxCycle Classifier
If you accidentally add a document to the classifier, it is possible to remove it:
- Find the document in the sidebar.
- Right-click on it in the sidebar and select Remove from classifier. (You can also select multiple documents before you right-click to remove them all from the classifier at the same time.)