Menu

Custom document outlines

Updated: 2020-07-20

Outlines specify the way that DoxCycle organizes the pages in the DoxCycle PDF. DoxCycle comes with built-in outlines, or you can create your own custom outline.

What are outlines?

A DoxCycle document outline specifies:
  • The document types that appear in the DoxCycle PDF
  • Folders to group document types
  • The order of the pages or documents types
  • What TaxCycle form the DoxCycle document links to for the posting of amounts from DoxCycle to TaxCycle.

Built in Views, DoxCycle, outlines in the index Built-in views/outlines in the index

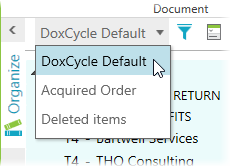
The index in DoxCycle comes with three built-in views or outlines: 

  • DoxCycle Default - Groups pages by type and taxpayer.
  • Acquired Order - Lists documents in the order they were scanned or imported
  • Deleted Items - Shows any pages deleted from the document (right-click on a page to restore it).

You can create more outlines that serve a similar function as the DoxCycle Default outline.

To change the current outline:
  1. Open the DoxCycle PDF.
  2. Select the outline from the view drop-down list at the top of the index. The document order and folder names will change.

import-outline636389224124767287

Import an outline

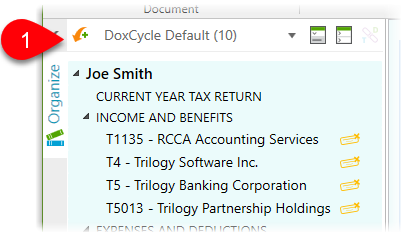
  1. If a you open a DoxCycle PDF that was last saved with a custom outline that you don't have in your options, an orange arrow appears allowing you add the outline to your options. Click the icon to use that outline and add it to your options (you can always delete the outline from options later). 
  2. If you open a DoxCycle PDF where the items in the index are in a different order than the selected outline, a blue asterisk appears. Click the asterisk to revert to the outline's default order.

Set up outlines in Options

  1. To open Options from the Start screen, click Options in the green bar on the left side. If you have a file open, go to File menu, then click Options.
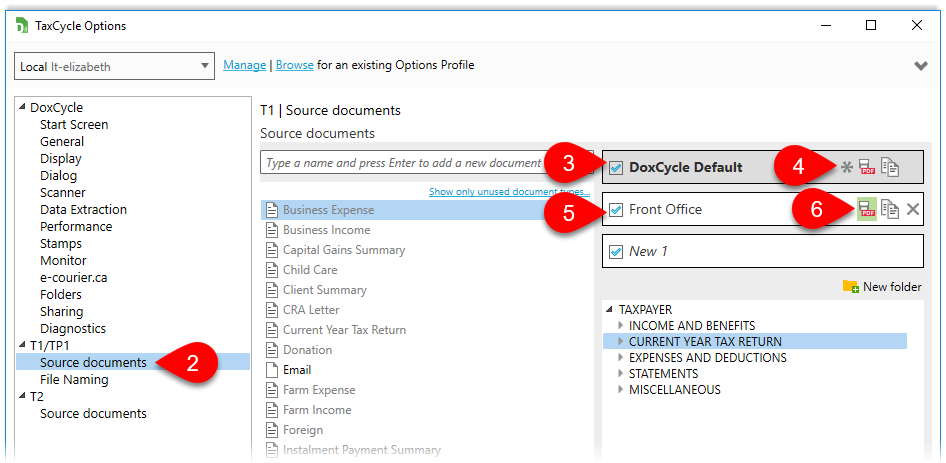
  2. On the left side of the dialog box, expand the T1/TP1 section, and click on Source documents. (To create adjust T2/CO-17 outlines, expand T2.)
  3. Available outlines appear at the top right of the outlines options page. DoxCycle comes with one built-in document outline: DoxCycle Default. You can edit this outline. 
  4. If you edit the built-in Default DoxCycle outline, a grey asterisk appears next to its name to show that it doesn't match the built-in outline. Click the asterisk to revert to the default setting. (Note, you can never delete the built-in outline, only revert it to the default.)
  5. Uncheck an outline to hide it from the index view menu (above the document index).
  6. Click the Save PDF button to set which outline is used when opening the PDF in a different reader. This sets the bookmarks in the order of the chosen outline.
  7. Drag and drop to change the order in which the outlines appear in the view menu at the top of the DoxCycle index. (The Acquired Order and Deleted Items views always appear at the bottom of this menu.) 

t1-source-documents-outlines

Create a new outline

New outline

There are two ways to create a new document outline:

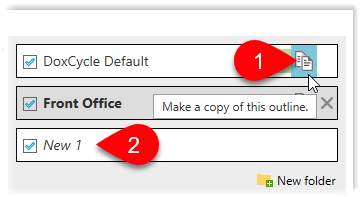
  1. Click on the Duplicate button on an existing outline to create a copy of the outline. Then, type a new name for the copy of the outline. Click anywhere off the print set box to save the name change.
  2. Double click the New 1 outline and type a new name. (As soon as you add document types to this outline, DoxCycle creates a new, blank outline set at the bottom of the list. This way, you can keep adding as many outlines as you need.)
  3. Click the delete icon next to the outline's name to delete the outline. You can never delete built-in outlines.

Document types

The column on the left shows a list of possible document types that you can add to an outline (see screen capture below):
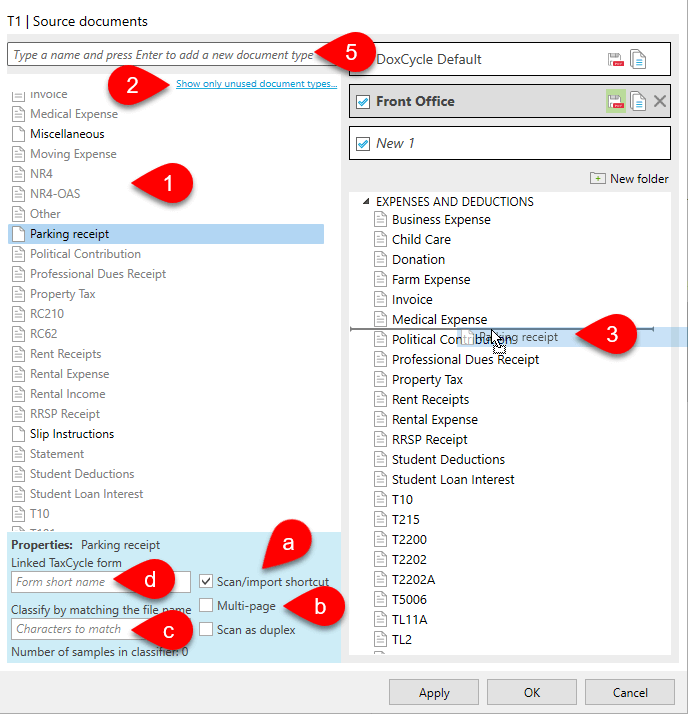
  1. Document types that are greyed out and have lines in the icon are already used in the outline that is currently selected on the right (the one in grey). (You can only use a document type once in each outline outline.)
  2. Click the link at the top of the list to show only unused document types or show all document types.
  3. Drag documents from the left to the right to add them to the selected outline.
  4. Click on a document type to set its properties in the blue box at the bottom:
    1. Check Scan shortcut to add a shortcut to the Home menu for scanning in that document type.
    2. Check Multi-page to indicate that the document is always a multi-page document.
    3. If you regularly import documents of this type with a specific file name, enter the matching part of the file name in the Classify by matching the file name field.
    4. For any document types you create, you can add a link to a TaxCycle form so that when you click the link button on the Page Assistant or in the document, it will open the specified form in TaxCycle. Enter the form's short name in this field. For example, Info for the Personal information worksheet.
  5. To create a new document type, type a new name in the field at the top of the list and press Enter
  6. Once the new document type appears in the list, you can set its properties (see above) and also add a linked form in TaxCycle (this is used to post amounts from the document to TaxCycle).
  7. For any document types you create, you can double-click to change the name. You cannot, however, change the name of the default document types that come with DoxCycle.  

doxcycle-options-source-documents

new-folder Organizing document types in an outline

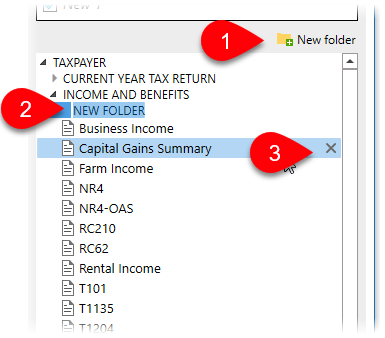
  1. Click the New Folder button to add a folder to an outline. Then, type to give the new folder a name and click away to save the name. You can drag the folder above or below the other folders to put it in the order you wish. (However, you cannot nest folders under each other.)
  2. You cannot change the TAXPAYER folder at the top of the outline. This indicates where the name of each taxpayer will be inserted in the index.
  3. Drag document types from the list on the left to the one on the right to add them to the outline. Once the document is on the right, you can put it into any folder or order you wish.(Document types used in the outline on the right appear greyed out and with lines in their icon in the list on the left.)
  4. Double-click on folder to edit the name. You cannot change the document type names in the column on the right. This must be done before.
  5. To delete a document from an outline, drag the document back to the list on the left, or click the X next to the document name.