Menu

Fujitsu ScanSnap

Updated: 2020-07-20

Some Fujitsu ScanSnap scanners do not include a TWAIN driver, so the setup process to make them work with DoxCycle is slightly different. 

Configure ScanSnap to send scanned documents to DoxCycle

Configure ScanSnap to send DoxCycle scanned documents and you can either add them to the current DoxCycle file or open them in a new DoxCycle window. DoxCycle installs a ScanSnap settings profile to help you do this.

To set up this profile:
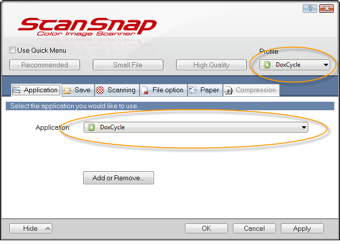
  1. Go to the Windows Start menu, then open All Programs > ScanSnap Manager > ScanSnap Manager settings.
  2. Uncheck the Use Quick Menu option, if it is checked.
  3. Click the Details button to expand the window, if required.
  4. From the Profile drop-down menu, select DoxCycle profile.

Configure ScanSnap to send DoxCycle

Create a new profile for DoxCycle

If you don't see this profile, you can create it in ScanSnap Manager settings:

  1. From the Profile drop-down menu, select Add Profile.
  2. Type DoxCycle and click OK.
  3. On the Applications tab, select DoxCycle in the Applications drop-down list and skip to step 8, below. If you don't see DoxCycle listed, keep going.
  4. Click the Add or Remove button.
  5. In the Add or remove applications dialog box, click the Add button.
  6. Browse to your DoxCycle installation folder and select DoxCycle.exe. By default, this is in C:\Program Files\Trilogy Software\DoxCycle
  7. Enter DoxCycle in the Application Name field and click OK.
    Adding a new profile
  8. Now, back on the Applications tab, select DoxCycle from the list of applications.
  9. Click on the Scanning tab.
  10. Select Best (Color/Gray: 300 dpi, B&W: 600 dpi) from the Image quality drop-down list.
  11. Select B&W from the Color mode drop-down list.
  12. Select Simplex Scan (Single-sided) from the Scanning side drop-down list.
    scansnapscanning
  13. Click the Apply button to save your changes. You'll be asked to confirm you want to save the changes. Click Yes.
  14. Now, select DoxCycle from the Profile menu on the top right and then click OK to close the ScanSnap Manager settings.

Configure Fujitsu ScanSnap folder monitoring

Once you configure DoxCycle to monitor a folder, either local or on your network, for scanned source documents, it will automatically place the scanned source document in the Unassigned Document Gallery for you to then import.

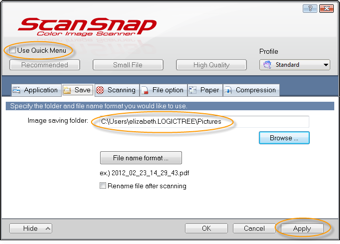
DoxCycle installs a ScanSnap profile that is optimized to produce the best possible results from your scanner.

To use this profile:
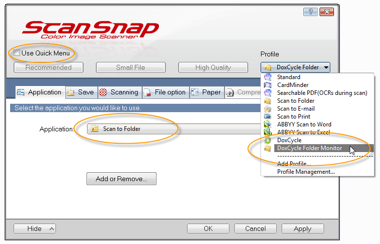
  1. Go to the Windows Start menu, then open All Programs > ScanSnap Manager > ScanSnap Manager settings.
  2. Uncheck the Use Quick Menu option, if it is checked.
  3. Click the Details button to expand the window, if required.
  4. From the Profile drop-down menu, select DoxCycle Folder Monitor profile.

ScanSnap profile dialog

Create a new profile for folder monitoring

If you don't see this profile, you can create it in ScanSnap Manager settings:

  1. Click the Detail button to expand the window, if required.
  2. On the Applications tab, select Scan to Folder.
  3. On the Save tab, browse for the folder where you want to save scanned documents. The monitored folder set in DoxCycle options should match the one set on the Save tab in the ScanSnap Manager settings. Check both these settings if documents aren't showing up.)  For example: \\server\scanneddocuments
    scansnapcreateprofile
  4. Click on the Scanning tab.
  5. Select Best (Color/Gray: 300 dpi, B&W: 600 dpi) from the Image quality drop-down list.
  6. Select B&W from the Color mode drop-down list.
  7. Select Simplex Scan (Single-sided) from the Scanning side drop-down list.
  8. Click the Option button and uncheck Allow automatic image rotation and click OK.
  9. On the Paper tab, set Multifeed detection to None.
  10. Click Apply to save the profile.