Updated: 2025-02-19
TaxCycle’s Data Mining tool allows you to run queries and identify clients within a return that match those queries. You can find the Data Mining button in the blue bar on the left of the Start screen and in the Data menu in all TaxCycle modules.
You must have a Data Mining site license to see the full list of matching clients. Without a license, you will only be able to see the first 10 matching clients for your query.

Step 1: Building a Query
To get started, build a query using the Query Editor. To build a query, you can type directly into the editor, drag and drop a field from any form, or use the query examples from the drop-down menu on the right.
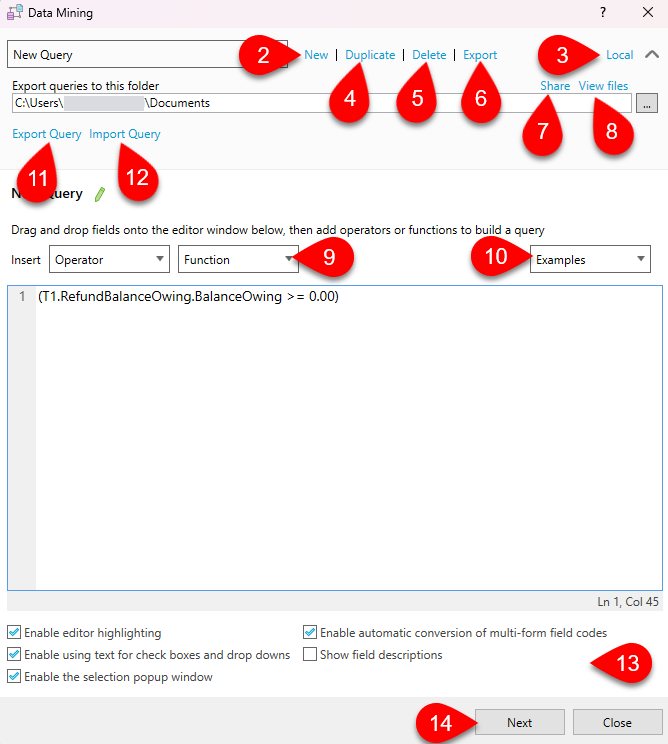
- In any TaxCycle module, go to the Data menu and click Data Mining. The Data Mining window will remain open even if you close the current return and open a new one.
- In the dialog window that opens, click New to create a new query.
- Click your Options Profile to open the Data Mining menu in TaxCycle Options. See the Data Mining Options section, below.
- Click Duplicate to create a copy of your query.
- Click Delete to remove a query. If you close the dialog window, TaxCycle will ask whether you want to save the changes you made or discard them. Clicking Discard will undo the deletion, along with any other changes you made.
- Click Export to view and edit the default folder where queries are saved. You can also click the arrow to the right of your Options Profile to expand this field.
- Click Share to grant read-only access to the default folder to everyone on your network.
- Click View files to open the folder in Windows Explorer and view the saved queries.
- Insert values from the Operator and Function drop-down lists to build a query. This example uses a query to check if any T1 clients have a balance owing (T1.RefundBalanceOwing.BalanceOwing) greater than $100. See the Operators and Functions help topics to learn more.
- You can also build a query using the query examples from the Examples drop-down list on the right.
- Click Export Query to save the current query to the default export folder. The saved file will contain the .savedQuery extension, which opens as an XML text file. You can also press Ctrl+S at any time to save changes you've made to a query.
- Click Import Query to import a saved query file into the editor window.
- Set any other options as required by checking or clearing the boxes at the bottom of the dialog window.
- Check Enable editor highlighting to use different colours to highlight different query elements.
- Check Enable using text for check boxes and drop downs to use plain text to test if a check box or drop-down field matches a value. For example, use “Yes” to test if a check box has been checked "Yes".
- If you drag a field onto the Query Editor that supports a list of options, check Enable the selection popup window to enable the editor to display a small popup window with a list of options for easy selection.
- If you drag a field from a slip or multiform, check Enable automatic conversion of multiform field codes to automatically convert the field code to use the “foreach” function so you can test the field on all copies of the slip or form.
- Check Show field descriptions to display a panel at the bottom of the editor window that shows a description of each field. This can help you identify what the field is if the field code is not very descriptive. Note that this panel does not show functions, and a relevant return must be open in order to read the field description. For example, reading T1 fields from a T2 return will result in blank field descriptions.
- Click Next to run a query.
Step 2: Running a Query
Before running a query, ensure that you are scanning and saving to the correct folders.
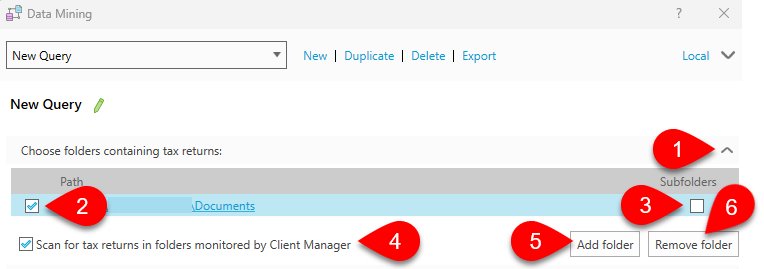
- Click the arrow to expand the menu under Choose folders containing tax returns.
- Uncheck the box next to a folder to exclude it from the scan.
- Check the box under Subfolders to also include subfolders in the scan.
- Check the box to Scan for tax returns in folders monitored by the Client Manager to include folders monitored by the Client Manager in the scan.
- Click Add folder to open Windows Explorer and select a folder to include in the scan.
- To remove a folder from the scan, select it so it is highlighted in blue and click Remove folder.
Next, choose the type of returns to include in the scan.
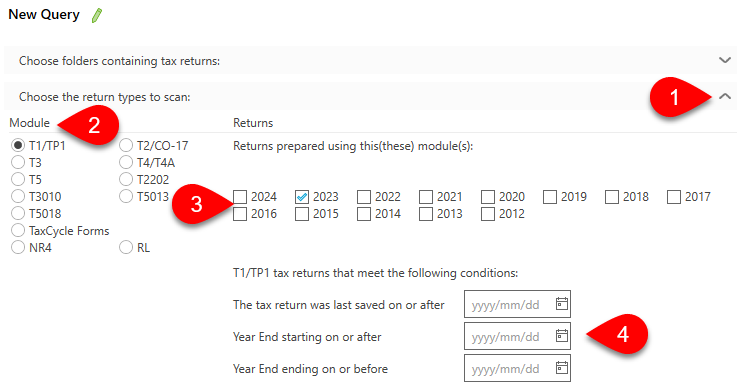
- Click the arrow to expand the menu under Choose the return types to scan.
- Select the Module for the query.
- Under Returns, select the tax year or years for the query. If you do not select a year, TaxCycle will query all returns for the selected module.
- You can limit the amount of tax returns included in the report by entering specific dates to scan. For example, enter the date the tax return was last saved.
Set additional settings for your query report under Options:
- Click the arrow to expand the Options menu.
- Check or uncheck the box to Count password-protected files.
- Check the Count file read errors box to keep a count of the files that could not be opened or read due to an unexpected error.
- Check the box to Pre-load metafile data (recommended). This preloads the calculations and other metadata for the relevant tax modules before opening each tax return discovered in the scan.
- From the Calculation Mode drop-down list, select what you want TaxCycle to do after opening the discovered tax returns:
- Select None to prevent TaxCycle from running any calculations.
- Select Calculate to run the calculations.
- Select Calculate and review to run the calculations and update any review messages.
- Select Calculate, review and optimize to run the calculations, update any review messages and trigger background optimizations if any are available.
- Select English or French field descriptions for the report’s column headers.

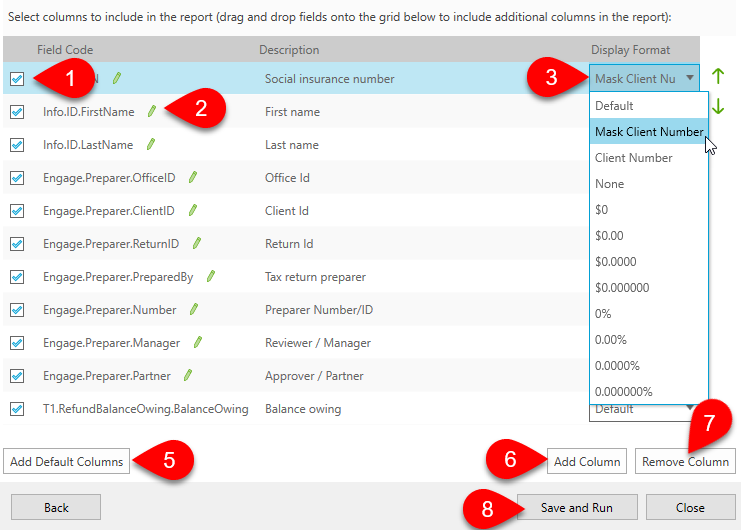
Lastly, select the columns to include in a query report before running the query.
- Check or uncheck the box next to a Field Code to include or exclude it from the query report.
- Click the green pencil to edit a field code. If there is no green pencil, this means the field code is part of the query itself and cannot be altered.
- You can change the formatting of the field code from the Display Format drop-down list. If you do not want TaxCycle to apply its default formatting and would like to format the values yourself in Excel® later, select None.
- To include a field in the report that is not part of the query, drag and drop that field onto the columns panel. This will add it to the report.
- Click Add Default Columns to add the default columns for the selected module to the report.
- Click Add Column to add a blank field where you can manually enter a field code.
- Click Remove Column to remove the selected column from the report. If you want to keep the column but do not want to include it in the report, uncheck the box on the left to deselect it.
- Click Save and Run to run the query report.
Step 3: Exporting a Query
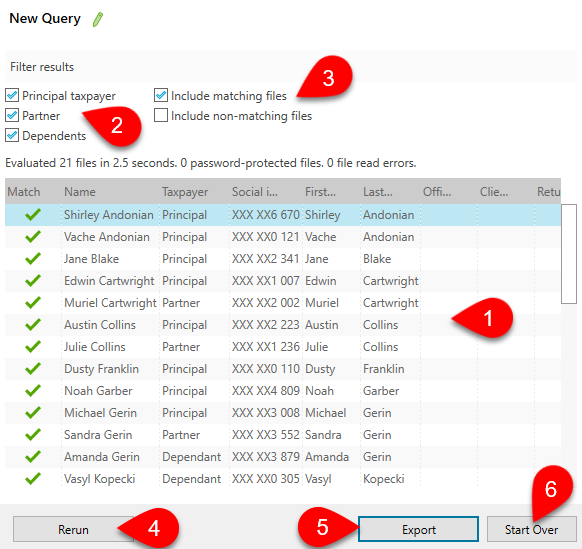
After running a query, you can export the results to a CSV file ready to open in Excel®, or you can filter the results and run the report again.
- You can view the results of a query in the grid. TaxCycle tells you how many files match the query.
- Under Filter Results, select which taxpayer you would like to include in the report.
- Check the box to Include matching files or Include non-matching files in the report.
- Click Rerun to run the query again with the filters applied.
- Click Export to export the results to a CSV file ready to open in Excel®.
- Click Start Over to go back to the Query Editor window in step 1.
Data Mining Options
TaxCycle saves each query to your Options Profile. If you don’t want to share queries using your options profile, you can manage these settings in Data Mining options.
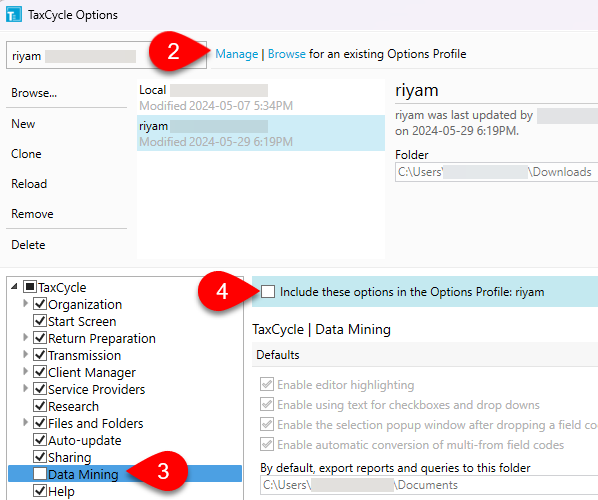
- To open Options from the Start screen, click Options on the left side. If you have a file open, go to the File menu, then click Options.
- Click Manage to expand the Options Profile section.
- Clear the Data Mining box in the tree on the left to exclude it from the Options Profile.
- If you change your mind, you can check the box to Include these options in the Options Profile.
- Click Apply.
- Click OK.
