Updated: 2023-04-05
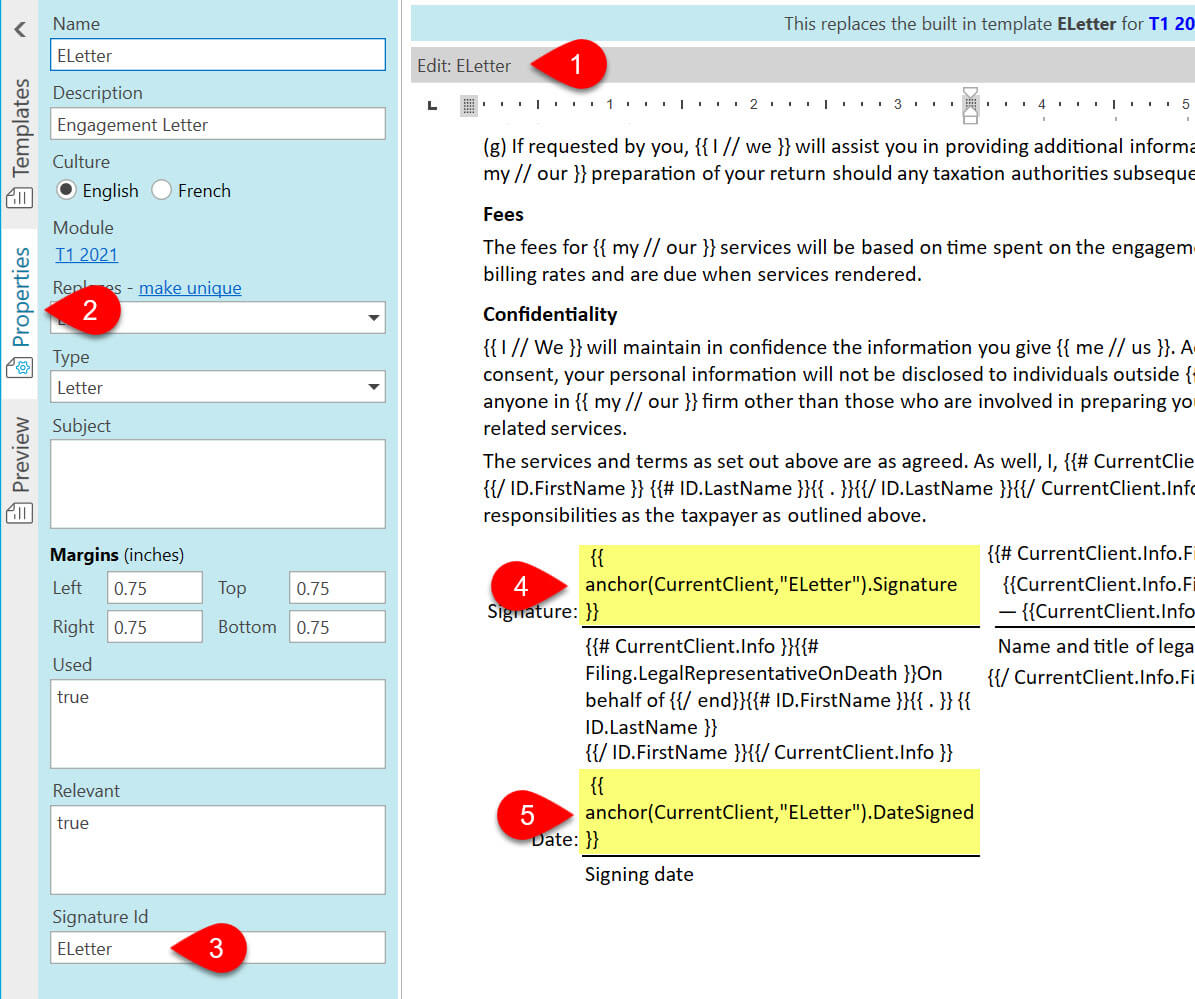
You can add code to your custom templates to indicate where the recipient should place the electronic signature and insert the date signed.
| Code | Description |
|---|---|
| {{ anchor(CurrentClient,"ELetter").Signature }} | This code instructs the electronic signature provider to insert the "Sign Here" indicator in the document. |
| {{ anchor(CurrentClient,"ELetter").DateSigned }} | This code tells TaxFolder and DocuSign® where to insert date in the signed document. |
For quick reference, we use the following elements in our built-in templates.
| Template | Signature Id | Signature Anchor | Date Signed Anchor |
|---|---|---|---|
| ELetter | ELetter | {{ anchor(CurrentClient,"ELetter").Signature }} | {{ anchor(CurrentClient,"ELetter").DateSigned }} |
| DELetter | DELetter | {{ anchor(.,"DELetter").Signature }} | {{ anchor(.,"DELetter").DateSigned }} |
| FPostSeason | FPostSeason | {{ anchor(.,"FPostSeason").Signature }} | {{ anchor(.,"FPostSeason").DateSigned }} |
| FPreSeason | FPreSeason | {{ anchor(.,"FPreSeason").Signature }} | {{ anchor(.,"FPreSeason").DateSigned }} |
| JPostSeason | JPostSeason | {{ anchor(.,"JPostSeason").Signature }} | {{ anchor(.,"JPostSeason").DateSigned }} |
| JPreSeason | JPreSeason | {{ anchor(.,"JPreSeason").Signature }} | {{ anchor(.,"JPreSeason").DateSigned }} |
| PostSeason | PostSeason | {{ anchor(.,"PostSeason").Signature }} | {{ anchor(.,"PostSeason").DateSigned }} |
| PreSeason | PreSeason | {{ anchor(.,"PreSeason").Signature }} | {{ anchor(.,"PreSeason").DateSigned }} |
The following example shows how to set up a customized T1 engagement letter (ELetter).
