Menu

Column Layouts

Updated: 2020-07-17

In the Client Manager List Returns view (see the Client Manager views help topic), you can choose which columns show and set the order in which they appear. You can also save these layouts and apply them to saved Quick Searches and Excel® export.

Select a column layout

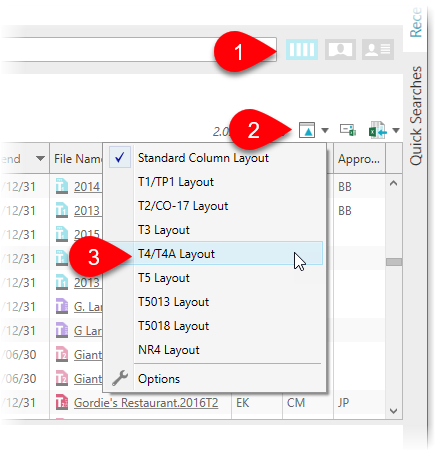
  1. Go to the List returns view in the Client Manager. See the Client Manager views help topic.
  2. Click on the Layoutbutton.
  3. Select a column layout to apply to the current view.

colomn-layout-select

Export to Excel® with a particular column layout

When you export to Excel®, TaxCycle will use the same columns in the same order as they appear on screen. See the Export to Excel help topic.

Default column layouts

The Client Manager comes with the following default column layouts:

Standard Column Layout This layout contains columns that applies to all tax modules. You can modify and delete it as you wish.
T1/TP1 Layout This layout contains the same columns as the Standard Column Layout, and includes additional columns for electronic filing and electronic services that apply to T1 and TP1 returns. You can modify and delete this layout if you wish.
T2/CO-17 Layout This layout contains the same columns as the Standard Column Layout, and includes additional columns for the electronic filing of T2, CO-17 and AT1 returns. You can modify and delete this layout if you wish.
T3 Layout This layout contains the same columns as the Standard Column Layout, and includes additional columns for the electronic filing of T3 returns.
T4/T4A Layout This layout contains the same columns as the Standard Column Layout, and includes additional columns for the electronic filing of T4, T4A, RL1 and RL2 returns. You can modify and delete this layout if you wish.
T5 Layout This layout contains the same columns as the Standard Column Layout, and includes additional columns for the electronic filing of T5 returns. You can modify and delete this layout if you wish.
T5013 Layout This layout contains the same columns as the Standard Column Layout, and includes additional columns for the electronic filing of T5013 returns. You can modify and delete this layout if you wish.
T5018 Layout This layout contains the same columns as the Standard Column Layout, and includes additional columns for the electronic filing of T5018 returns. You can modify and delete this layout if you wish.
NR4 Layout This layout contains the same columns as the Standard Column Layout, and includes additional columns for the electronic filing of NR4 returns. You can modify and delete this layout if you wish.

Column layout options

  1. Go to the Columns page in options:
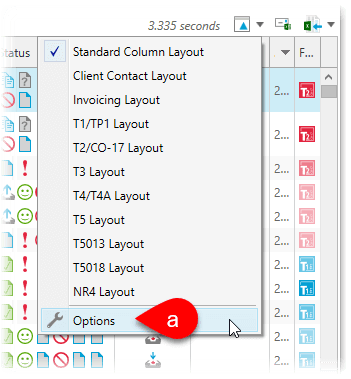
    1. Click the Layout button in the List returns view and select Options.
    2. Or, go to the File menu, then Options. (If you are on the Start screen, click Options in the blue bar on the left.) On the left-hand side of the dialog box, expand the Client Manager section and click on the Column page.

2018-client-manager-open-column-options

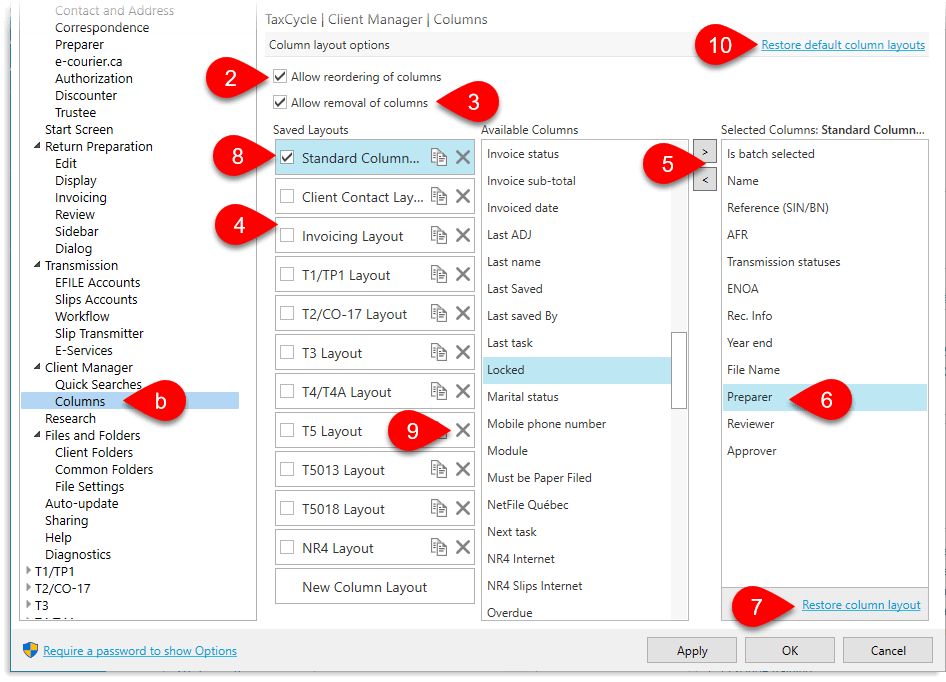
  1. At the top of the page, check Allow re-ordering of columns to let users drag and drop columns to a new position.
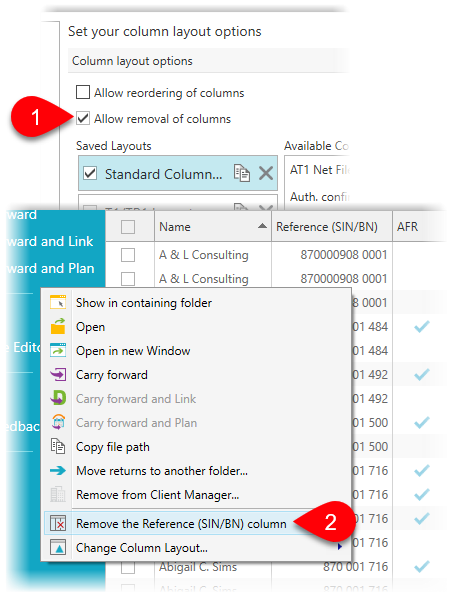
  2. Check Allow removal of columns to let users remove a column from the view using the right-click menu.
  3. Click once on a layout name in the list to create a new layout or modify an existing one.
  4. To add a column to the layout, drag a column title from the Available Columns to the Selected Columns. Or, click once on a column title and press the right arrow to move it. To remove a column from a layout, drag the column title from the Selected Columns to the Available Columns. Or, click once on the column title and press the left arrow to move it.
  5. Within the Selected Columns pane, drag and drop a column title to re-order.
  6. To restore a default column layout, click Restore column layout.
  7. Check the box next to the layout name to set it as the default column layout.
  8. To delete a layout, click the Delete button next to the name.
  9. To restore all the column layouts that come with the Client Manager and delete any layouts you created, click Restore default column layouts.

2018-client-manager-options-columns

Drag and drop to re-order columns

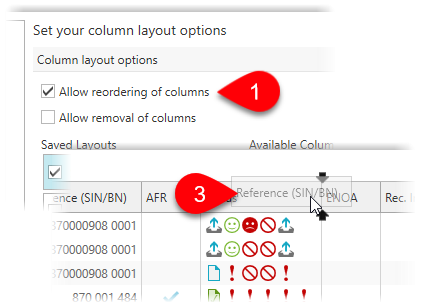
  1. Make sure Allow reordering of columns is enabled in Column Layouts options.
  2. Click and hold a column heading.
  3. Drag it to another location.
  4. When your cursor is where you want the column, release the mouse button.

Drag column headings

Remove a column from view

  1. Make sure Allow removal of columns is enabled in Column Layouts options.
  2. In the Client Manager, right-click on the column (not on the column heading) and select Remove column.

Right-click to remove a column

Create a new layout

  1. Go to the Column Layout page in options (see above).
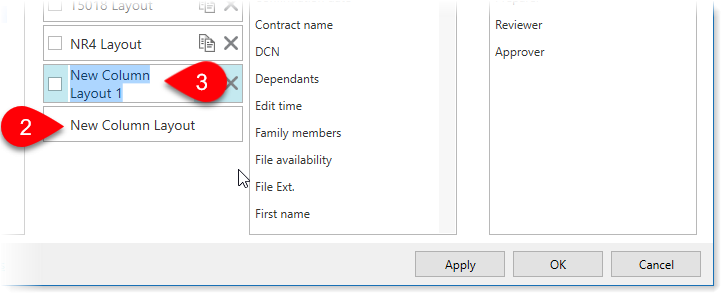
  2. Click once on New Column Layout and begin re-arranging the columns. This changes the name to New Column Layout 1 and populates the Selected Columns with the defaults from the Standard Column Layout.
  3. Double-click on the name to enter a new one.
  4. Click Apply or OK to save your changes.

create-layout

Duplicate an existing layout

A quick way to create a new layout is to clone, or duplicate an existing one:

  1. Go to the Column Layout page in options (see above).
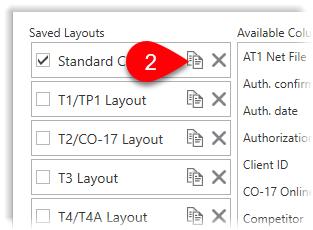
  2. Click once on the Duplicate button on the layout.
  3. Double-click to re-name the layout.
  4. Add/remove columns and change the order of columns just as you would in an existing layout.

Duplicate a column layout

Assign a layout to a saved search

Saved Quick Searches can have an associated layout in them. When you create a new saved search, it automatically includes the layout you are currently using to view the results.

To change the layout for an existing search:

  1. Open the Quick Searches sidebar in the Client Manager.
  2. Click once on a saved search to view the results in the Client Manager.
  3. Right-click on the name of the saved search, select Change Column Layout and then choose the layout you wish to apply.
  4. Click the Save button to save the changes to the search.

To associate a layout to a saved search from within Options:

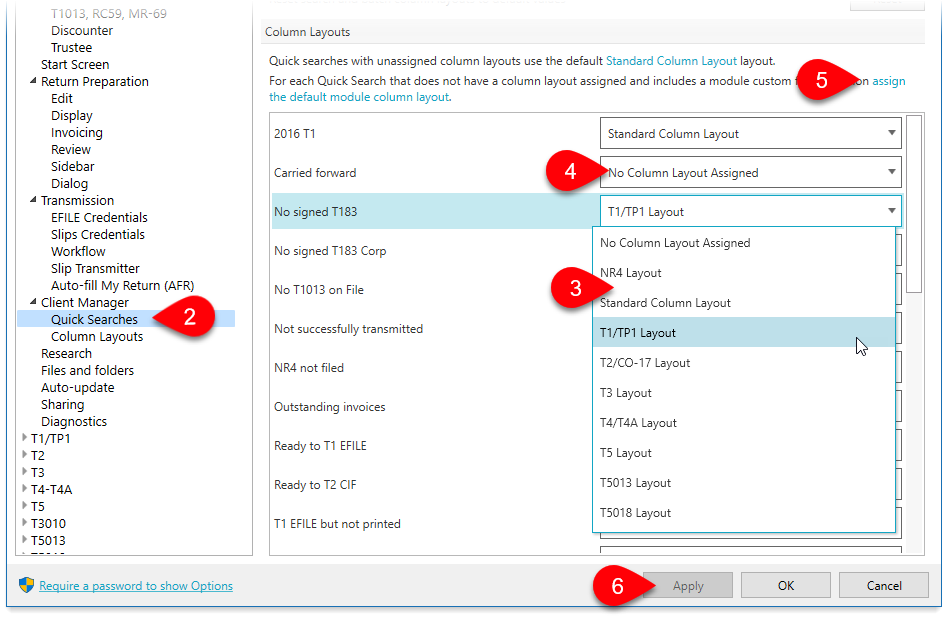
  1. To open options, go to the File menu, then Options. Or, if you are on the Start screen, click Options in the blue bar on the left.
  2. On the left, expand Client Manager and click on Quick Searches.
  3. On the right, use the drop-down next to each saved search to select a column layout.
  4. If you do not assign a column layout, the drop-down shows No Column Layout Assigned. The saved search will then use the default layout selected in Columns Layout options.
  5. To automatically assign the appropriate module-specific column layouts to Quick Searches, click the assign the default module column layout link. TaxCycle will look at each saved search and evaluate whether a module-specific layout is appropriate. For example, it will assign the T2/CO-17 Layout to the No signed T183 Corp search.
  6. Click Apply or OK to save your changes.

Saved search column layout