Québec MR-69 Authorization
As a tax preparer, use the MR-69 form to gain consent from a client to act as their representative with Revenu Québec. You may then access your client's confidential information and download data from Revenu Québec's Tax Data Download. If the authorization includes acting as power of attorney, you may also make changes to their account.
Complete the MR-69 in TaxCycle and have your client sign it. Then, you can electronically file this request from TaxCycle.
Within a few minutes of receiving the transmission, the automated system at Revenu Québec reviews the fields and verifies that there is a signature. If the form passes inspection, you will gain access to the client's account right away. If the inspection fails, you will need to re-submit the signed documents. To find out the processing status of an MR-69 submission, check the Revenu Québec Mon dossier pour les représentants professionnels (page only available in French); the status is not communicated back to TaxCycle.
Electronic MR-69 submission is available in TaxCycle T1/TP1, T2, T3 and T5013.
NetFile transmission options
Before you can transmit, you must enter your NetFile credentials in TaxCycle options:
- If you have a file open, go to the File menu, then click Options. To open Options from the Start screen, click Options in the blue bar on the left side. (You can also access these EFILE options any time by clicking on the wrench icon in the Transmit sidebar.)
- On the left side of the screen, expand Transmission and then click on EFILE Accounts.
- If your NetFile Québec number is the same as the one for the CRA, enter your EFILE Number and EFILE Password, then check the box to Use your EFILE Number for NetFile.
- If your NetFile Québec number is different from the EFILE number, enter it in the NetFile Number field.
- Enter your NetFile Québec password in the NetFile Access Code field.
- Click OK to save the options.

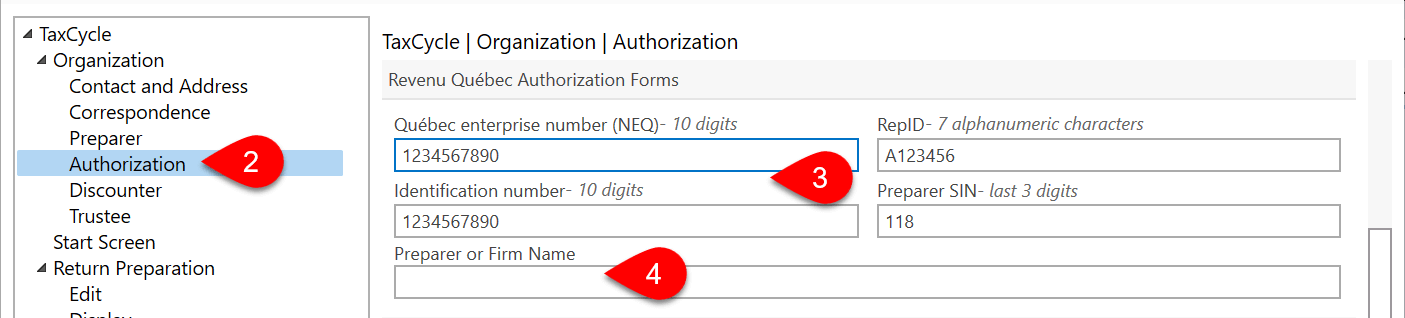
Revenu Québec authorization options
Enter defaults required for the completion of MR-69 in options:
- To open options, go to the File menu, then Options. Or, if you are on the Start screen, click Options in the blue bar on the left. The settings below are accessible from the section on the left-hand side of the Options dialog box.
- On the left, expand the Organization section and click on the Authorization page.
- In the Revenu Québec Authorization section, enter your firm's Québec enterprise number (NEQ), Identification number, RepID, last three digits of the Preparer SIN.
- If you need to use a different Preparer or Firm Name on the MR-69, enter that name on the page.
- This information is inserted into the Preparer / Firm Representative section on the Engagement worksheet and flows to the MR-69 from there.
New file defaults for the MR-69
In options, you can also see the default values for fields on the MR-69. These are then entered on the form when you create or carry forward a file. They will also trigger a review message if the form doesn't match the default set in options.
- From the Start screen, click Options in the blue bar on the left side. If you have a file open, go to the File menu, then click Options.
- On the left, expand T1/TP1 (or another module) and click on New File to apply the settings to all years. To set different options for a particular year, expand the section and click on a year.
- On the right, scroll until you see the section for MR-69 Default values.
- Set the default Authorization Type: Power of attorney allows the authorized person to make changes to the client’s tax return, while Authorization does not (it only allows access to information about the client). When you create a new return and set the province of residence to Québec, the Authorization Type is set in the MR-69 section on the Engagement worksheet. This then flows to the MR-69 form.
- Select an option under Signing Date:
- Choose No default to leave the check boxes at the top of the MR-69 blank and manually enter the signing date on the Info worksheet.
- Choose Insert the current date when printing to check the box near the signing field on the MR-69 that tells TaxCycle to insert the date when you print the form.
- If you select Enter the signing date manually or leave it blank, TaxCycle leaves the field blank for you to manually enter the information.
- Click Apply or OK to save your changes.

Complete the MR-69 and obtain the client's signature
- At the top of the MR-69, select the type of authorization to prepare for the taxpayer:
- Authorization allows the designated person to consult confidential information and documents held by Revenu Québec.
- Power of attorney allows the designated person to consult confidential information and documents AND allows the designated person to act on the behalf of the taxpayer with Revenu Québec. This allows the designated individual to make changes to the taxpayer's tax file.

- Complete the remaining fields on the MR-69. TaxCycle highlights the required information with review messages.
- Print two copies of the MR-69 form. See the Print/PDF a Form help topic.
- Obtain signature on two copies of the form from your client. You are required to retain an original signed copy on file in case Revenu Québec requests it.
Attach a signed PDF copy to the MR69Results worksheet
When submitting the MR-69 electronically, you must attach a signed copy of the form. In TaxCycle, this is done from the MR69Results worksheet.
- Scan the signed copy of the MR-69 form.
- Open the MR69Results worksheet.
- Drag and drop the file onto the File path column or double-click the field to browse and select the file.
- Select the language of the form being submitted.
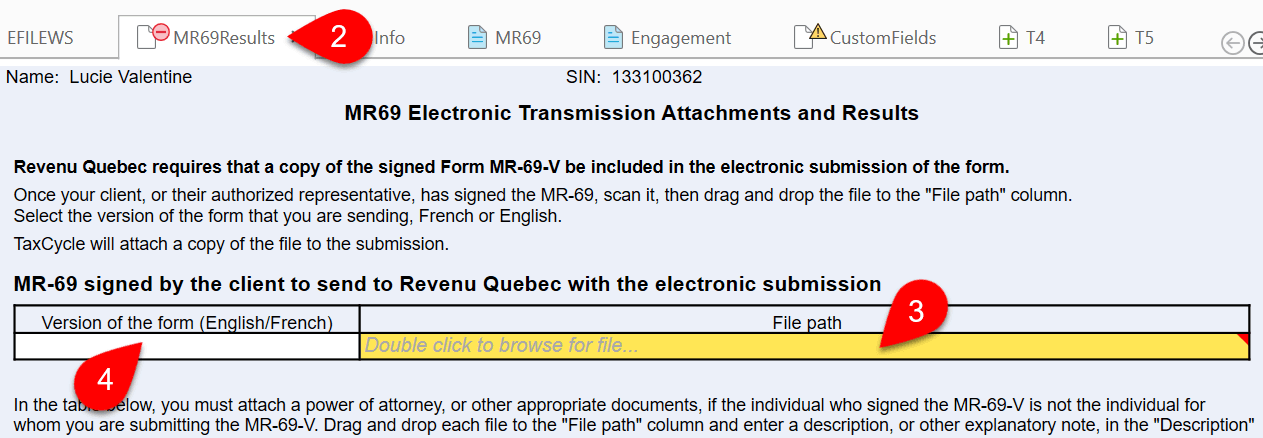
- Attach any additional power of attorney or resolution documents in the second table on the worksheet, including a description of each attached document.
- On the MR-69 form, check box 60 to indicate that two copies of the form have been signed.

Transmit the signed MR-69
- Click Transmit in the sidebar, or press F12.
- Click once on the MR-69 box to expand it and see details of the transmission status. If all review messages are resolved, the form is Ready to transmit.
- Click the Transmit Now! link to begin the transmission.
Transmission results
Upon successful transmission, you will see:
- The words Transmission successful in green text and green happy face. This is the same symbol that appears in the Client Manager for successful transmissions, and it also appears (white on blue) in the blue bar at the bottom of the window of any open tax return, so you can quickly see the current status.
- The box also shows the Confirmation number for future reference.
- Optionally, click the link to print a transmission receipt for your client or files.
- Click the MR69 Attachments and results link to view the worksheet which contains a full list of the results from all transmission attempts.
Within a few minutes of receiving the transmission, the automated system at Revenu Québec reviews the fields and verifies there is a signature. If the form passes inspection, you will gain access to the client's account right away. If the inspection fails, you will need to re-submit the signed documents. To find out the processing status of an MR-69 submission, check the Professional Representatives My Account; the status is not communicated back to TaxCycle.
If an MR-69 transmission is rejected—meaning that the document was not received by the Revenu Québec system and is not being processed—you will see the words Transmission rejected and a red sad face. To attempt transmission again, click Dismiss all messages and start again.
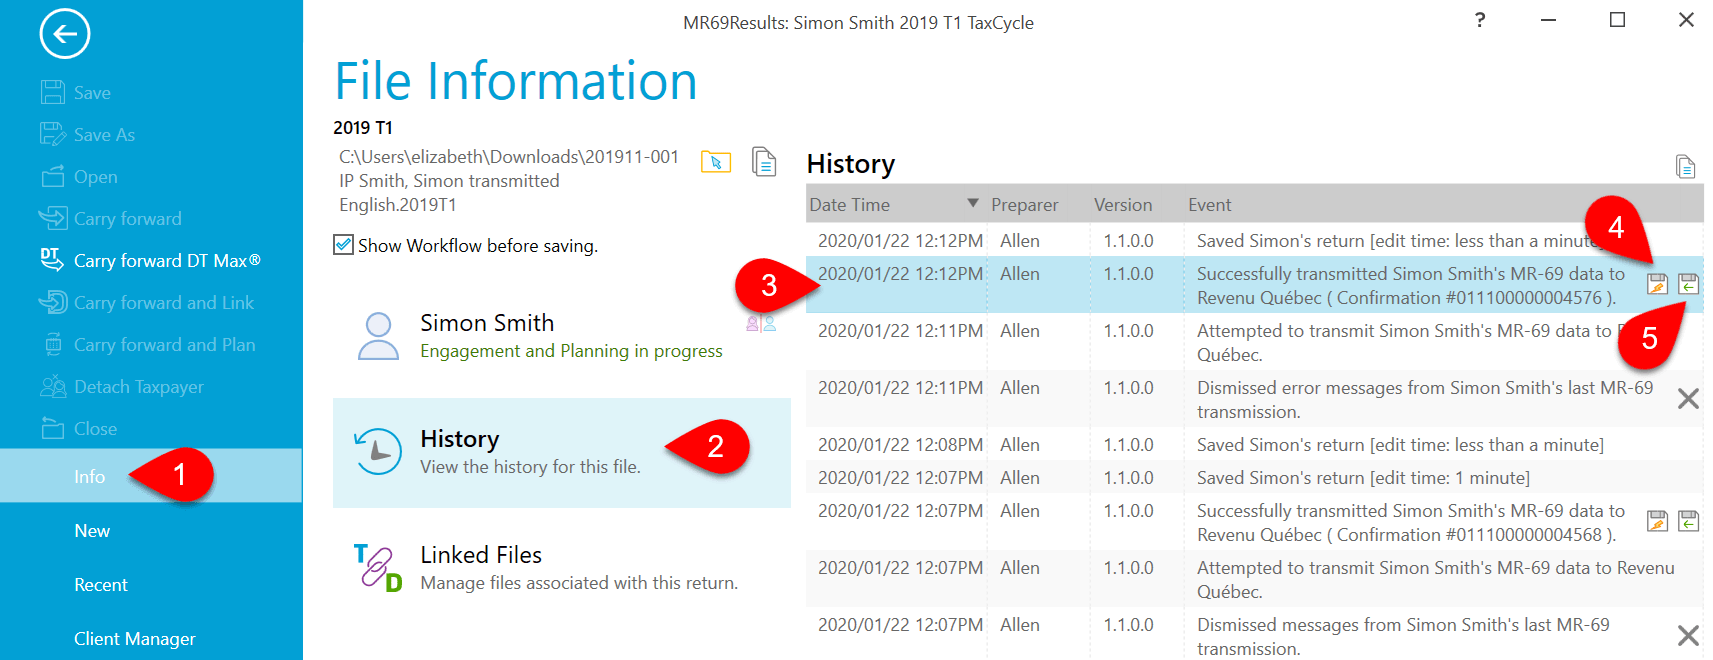
Transmission history
Each MR-69 transmission attempt is recorded in the file history:
- Go to the File menu, then click on Info.
- Click on History.
- Find the record of the transmission in the list.
- Click the first save button (the one with the lightning bolt) to save a copy of the XML file that was transmitted to the CRA.
- Click the second save button (the one with the green arrow) to save a copy of the response sent back from the CRA.
- TaxCycle also updates the workflow information for the taxpayer. (See the Workflow Groups and Tasks help topic.)