Menu

Document and Engagement Status in TaxFolder

Updated: 2024-04-19

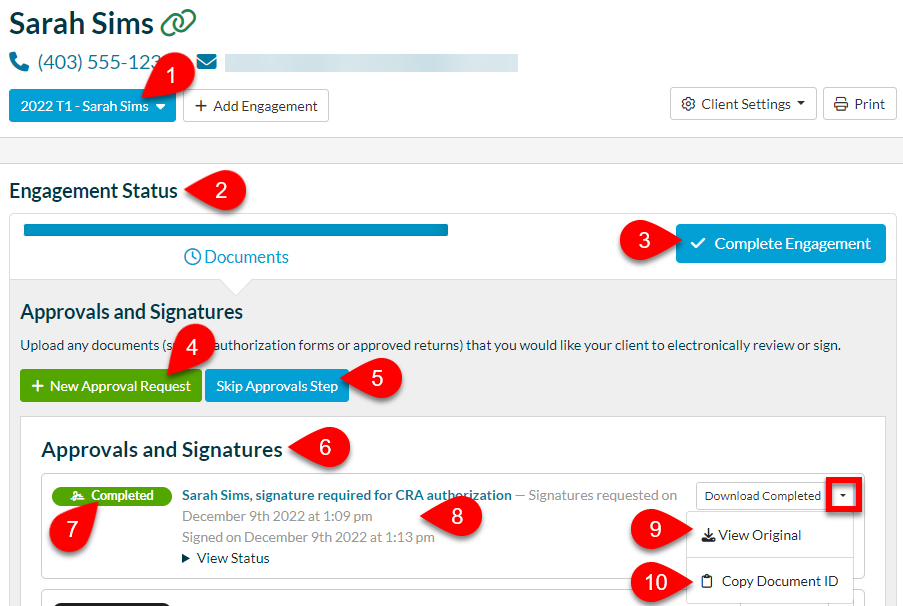
The Engagement Status section of the client record displays the current status of the engagement selected at the top of the page. It also allows you to add more documents for approval/signature, resend requests, update the phone number and email address used to request the signature and more.
Screen Capture: Engagement Status

  1. If the client has multiple engagements, click the drop-down in the client details to switch between engagements.
  2. The Engagement Status section changes to show the details of the selected engagement.
  3. Click the Complete Engagement button to move the engagement to the Completed tab on the Preparer Dashboard. Preparers can no longer request e-signatures from this client. If you would like to perform additional actions, use the engagement settings to change the status back to In Progress (see Managing Engagements in TaxFolder).
  4. Click the New Approval Request button to upload a document and request signature or approval of that document. See the Send a Document for Signature or Approval from TaxFolder help topic for detailed instructions.
  5. Click Skip Approvals Step to indicate that signatures or approvals are not required for this engagement (this is different than marking a request as complete, see below).
  6. Each document (or collection of documents) sent to the client shows in the list of Approvals and Signatures.
  7. The Document State appears on the left. See the Documents States in TaxFolder help topic for more information.
  8. The time and date stamps of the request and approval/signature appear under each request.
  9. Click the View Original button to see the unsigned/unapproved copy of the document.
  10. The last page of the final copy includes the Electronic Signature Certificate which provides the unique Document ID along with the time and date of the request and approval. Keep this page as an audit trail of the signature/approval request should you need it. Click Copy Document ID to copy it to your clipboard.
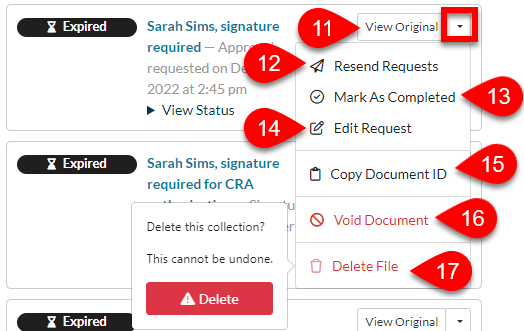
  11. For Sent documents that are not yet signed or approved, click the View Original button for additional options.
    Screen Capture: View Original button
  12. Select Resend Requests to resend the email to the client with the link to sign or approve the document.
  13. Select Mark As Completed if you received the signature or approval by a different means. This changes the status of the document to complete without receiving a signature or approval through TaxFolder. You are then responsible for collecting that signed document or approval through another method.
  14. Select Edit Request to update the details related to the request. This allows you to edit the details of the request using the same fields as when you send a document for signature or approval from TaxFolder. This is where you go to edit the email address or mobile phone number of the client for a specific request. See also Edit the TaxFolder Signature Request Email.
  15. Click Copy Document ID to copy the unique document ID, which you can use to narrow down a search in TaxFolder History.
  16. Click Void Document to void the document. See the Void the TaxFolder Signature Request Email help topic for detailed instructions.
  17. Select Delete File to remove the file from TaxFolder so that neither you nor the client can access it. You must confirm by clicking the Delete button as you cannot undo this action.