Updated: 2024-12-04
Engagements in TaxFolder track interactions with your clients. A client must have an active engagement for you to request signatures and approval from your client, or ask your client upload documents.
Engagements Properties
The relationship between clients and engagements is one-to-many. Each client can have more than one engagement, but each engagement is only ever associated with one client.
When it comes to documents, each engagement can hold many documents and signature/approvals requests. For example, when you print from TaxCycle, you can select an existing engagement to add the documents. You can use a single engagement as a container to collect and hold all the documents related to a specific client engagement for the year.
Each engagement has associated properties:
- Tax Preparer—The preparer assigned to engagement.
- Return Type—The type of tax return the client is engaging you to prepare. For example, T1 is for personal tax returns and T2 for corporate tax returns. When TaxCycle creates an engagement through its print process, it automatically sets this property to the same as the file from which the form was printed. If you create the engagement through the TaxFolder Client Dashboard, you can choose other options, including “Legal,” “Other” and “Forms” that you can’t print from TaxCycle.
- Tax Year—The tax year or tax year end to which the engagement applies. For example, 2020 for a T1 or 2020/12/31 for a T2 tax year end. When TaxCycle creates an engagement through its print process, it automatically sets this property to the same year or year end as in the TaxCycle file from which the form was printed.
- Engagement Label—The label can be any text you wish. When TaxCycle creates an engagement through its print process, it automatically enters the client’s name as the label. However, you can enter other text in the field if you wish. Or you can select an existing label from the list. In the TaxFolder Client Dashboard, you can enter any text you want for a label when creating the engagement.
Add an Engagement on the Preparer Dashboard
When you add a new client—whether through adding the client through the Preparer Dashboard or requesting a signature from TaxCycle—TaxFolder creates an engagement.
To add an engagement for an existing client in TaxFolder:
- Go to the Client List tab in the Preparer Dashboard.
- Find the client in the list and click the Add Engagement button.
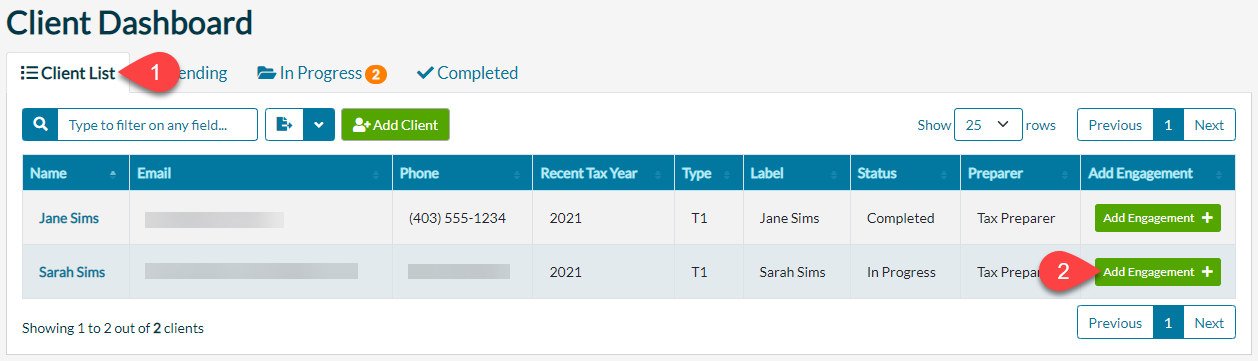
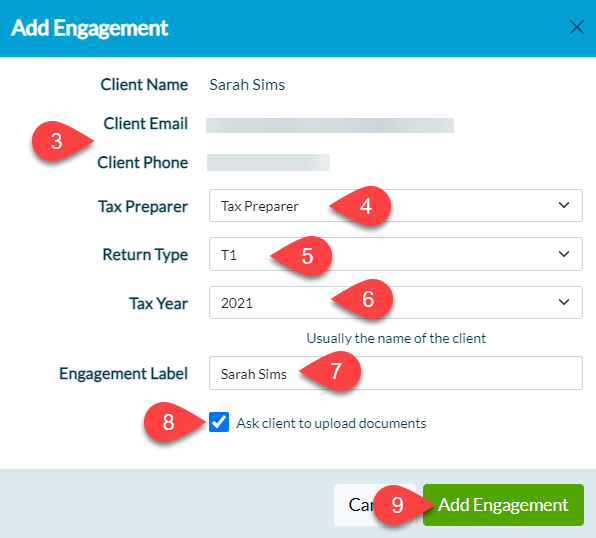
- TaxFolder displays the client’s name, email address and phone number (if available). (If the phone number does not appear here, you can add or edit it in the client record. See the Managing Clients in TaxFolder help topic.)
- Select a Tax Preparer to assign to the engagement. If you do not assign a preparer to the engagement at this time, TaxFolder displays the new engagement with a warning that you must still assign the engagement to a preparer before you can request signatures. You can also reassign the engagement to another team member from your firm later if needed.
- Select the Return Type. The type of tax return the client is engaging you to prepare. For example, T1 is for personal tax returns and T2 for corporate tax returns. When TaxCycle creates an engagement through its print process, it automatically sets this property to the same as the file from which the form was printed. When you create the engagement through the Preparer Dashboard, you can choose other options, including “Legal,” “Other” and “Forms” that you can’t print from TaxCycle.
- Select the Tax Year. The tax year or tax year end to which the engagement applies. For example, 2020 for a T1 or 2020/12/31 for a T2 tax year end. When TaxCycle creates an engagement through its print process, it automatically sets this property to the same year or year end as in the TaxCycle file from which the form was printed. When adding an engagement through the TaxFolder dashboard, you can only select from a list of years.
- Enter an Engagement Label. The label can be any text you wish. When TaxCycle creates an engagement through its print process, it automatically enters the client’s name as the label. However, you can enter other text in the field if you wish, or you can select an existing label from the list. In the TaxFolder Client Dashboard, you can enter any text you want for a label when creating the engagement.
- Check the Ask client to upload documents box to send the client an email asking them to upload documents to the Client Portal.
- Click the Add Engagement button.
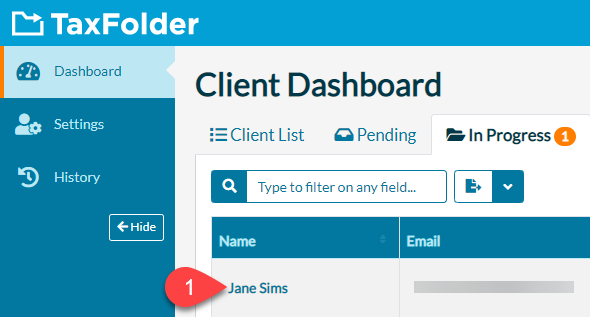
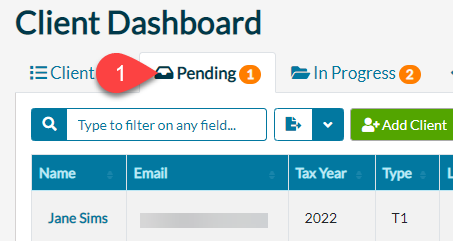
- At this point the client shows on the In Progress tab in the Client Dashboard. If you did not assign a preparer to the engagement in step 4, the client shows on the Pending tab instead.
Add an Engagement from the Client Record
- On the Dashboard, click on the client’s name to open their record.
- At the top of the client record, click the Add Engagement button.
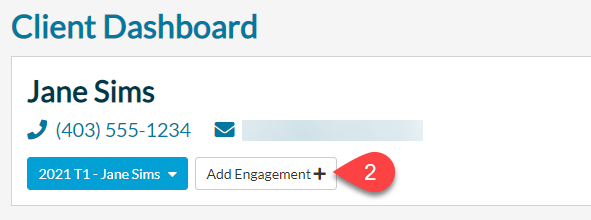
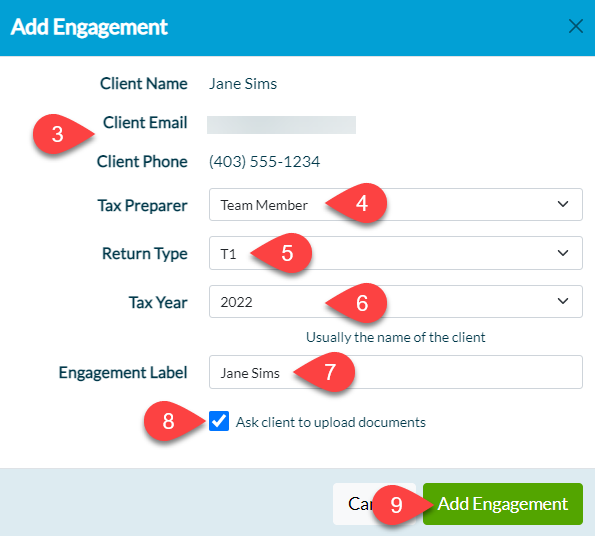
- TaxFolder displays the client’s name, email address and phone number (if available). (If the phone number does not appear here, you can add or edit it in the client record. See the Edit Client Info in TaxFolder help topic.)
- Select a Tax Preparer to assign to the engagement. If you do not assign a preparer to the engagement at this time, TaxFolder will display the new engagement with a warning that you must still assign the engagement to a preparer before you can request signatures. You can also reassign the engagement to another team member from your firm later if needed.
- Select the Return Type. The type of tax return the client is engaging you to prepare. For example, T1 is for personal tax returns and T2 for corporate tax returns. When TaxCycle creates an engagement through its print process, it automatically sets this property to the same as the file from which the form was printed. When you create the engagement through the Preparer Dashboard, you can choose other options, including “Legal,” “Other” and “Forms” that you can’t print from TaxCycle.
- Select the Tax Year. The tax year or tax year end to which the engagement applies. For example, 2020 for a T1 or 2020/12/31 for a T2 tax year end. When TaxCycle creates an engagement through its print process, it automatically sets this property to the same year or year end as in the TaxCycle file from which the form was printed. When adding an engagement through the TaxFolder dashboard, you can only select from a list of years.
- Enter an Engagement Label. The label can be any text you wish. When TaxCycle creates an engagement through its print process, it automatically enters the client’s name as the label. However, you can enter other text in the field if you wish, or you can select an existing label from the list. In the TaxFolder Client Dashboard, you can enter any text you want for a label when creating the engagement.
- Check the Ask client to upload documents box to send the client an email asking them to upload documents to the Client Portal.
- Click the Add Engagement button.
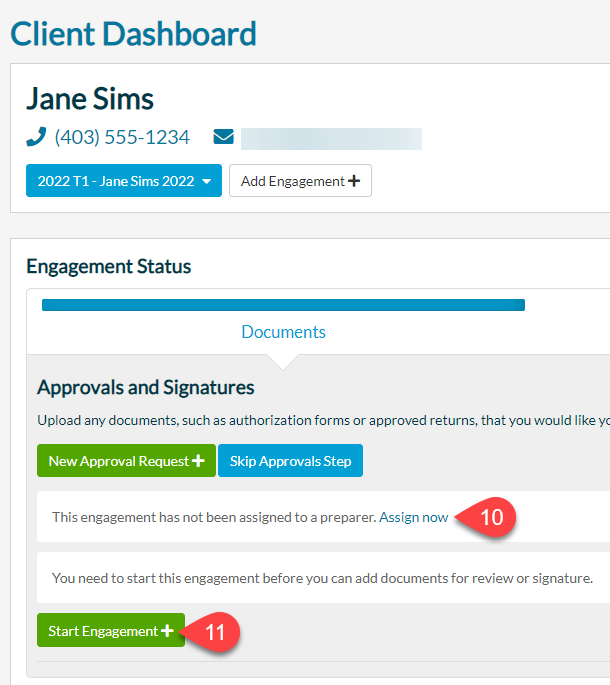
- At this point, if you did not assign a preparer to the engagement during step 4, the client record will display a warning that you must still assign the engagement to a preparer before you can request signatures from TaxFolder. Click the Assign now link to go to the Pending tab in the Preparer Dashboard to complete this step.
- The client record also displays the new engagement with a warning that you must start the engagement before you can add documents for review or signature. Click Start Engagement.
Assign an Engagement to a Preparer
It is important to assign an engagement to a preparer before you start working on it in TaxFolder. (This automatically occurs when you create the engagement from TaxCycle.) You cannot send a request for signatures from TaxFolder unless the engagement is assigned to a preparer (even if you are the only preparer with access to the TaxFolder account).
- Go to the Pending tab.
- In the Preparer column, choose a preparer from the list.
- Click Save to assign the engagement.
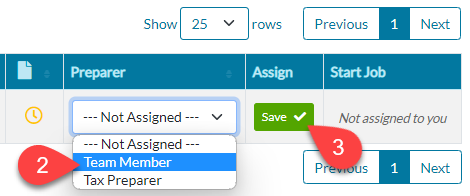
- TaxFolder sends an email to the preparer informing them they have a new engagement.
- The preparer can now use the engagement to send documents for approval or signature. The engagement now appears on the In Progress tab in the Preparer Dashboard.
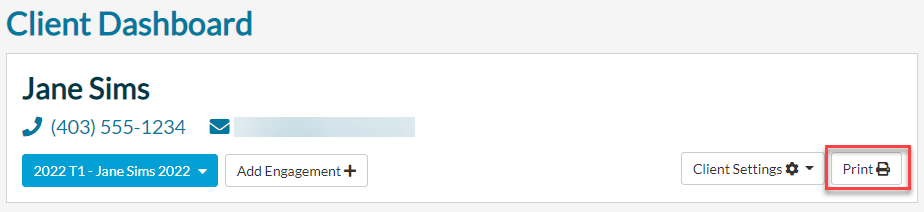
Switch Between Engagements on the Client Record
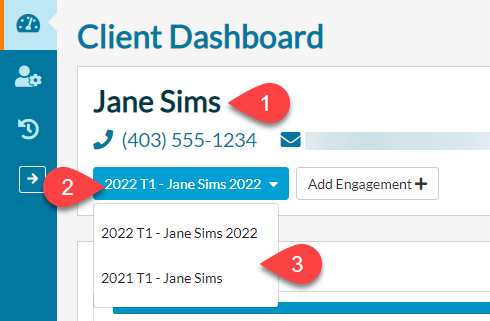
When you click on a name in the Preparer Dashboard, it takes you to the client record. This is the same page where you edit the details of an engagement.
- The first box on the page contains details about the client. The rest of the page shows details of the engagement selected in this box.
- If the client has multiple engagements, the drop-down menu allows you to switch between engagements without leaving the page.
- This menu shows all engagements associated with the client, including pending and completed engagements from all years. If the client has multiple engagements from the same year and return type, TaxFolder adds a number to the end of the item to help you tell the engagements apart.
Modify or Delete an Engagement
To modify the properties of an existing engagement:
- On the Dashboard, click on the client’s name to open their record.
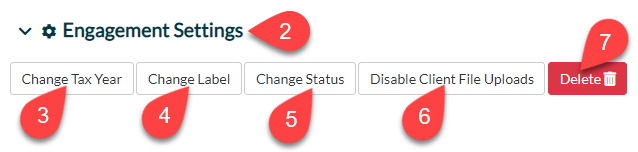
- Scroll to the Engagement Settings box at the bottom of the page.
- Click the Change Tax Year button to move the engagement to a different year. In the pop-up that appears, select the New Tax Year and click the Change Tax Year button to save your changes.
- Click the Change Label button to change the text for a label. In the pop-up that appears, type your changes and click the Change Label button to save your changes.
- Click the Change Status button to move the engagement between the Pending, In Progress and Completed states. In the pop-up that appears, select the new state and click the Change Status button to save your changes. Note that you cannot send a request for e-signatures unless the engagement is In Progress. Updating the status to “Completed” will notify the client that their engagement is complete.
- Click Disable Client File Uploads to prevent the client from uploading documents to the client portal. Once disabled, you can also re-enable this setting by clicking “Enable Client File Uploads.”
- Click the Delete button to remove the engagement permanently. This does not delete the client record, just the engagement. In the pop-up that appears, click the Confirm Delete button to confirm.
Complete an Engagement
To complete an engagement:
- On the Dashboard, click on the client’s name to open their record.
- Click the Complete Engagement button.
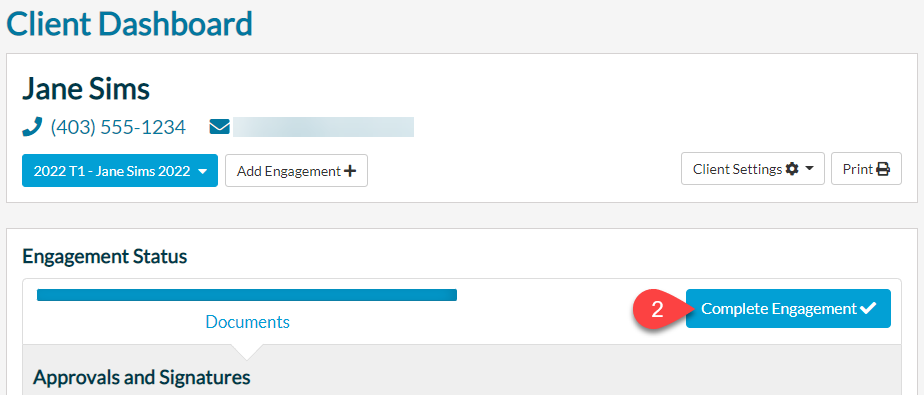
- TaxFolder moves the client to the Completed tab on the Preparer Dashboard.
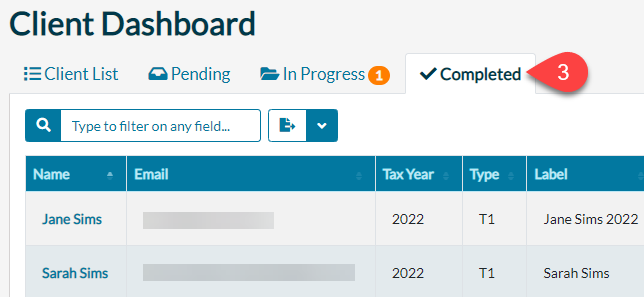
- You can no longer request e-signatures from this client. If you would like to perform additional actions, use the engagement settings to change the status back to In Progress (see above).
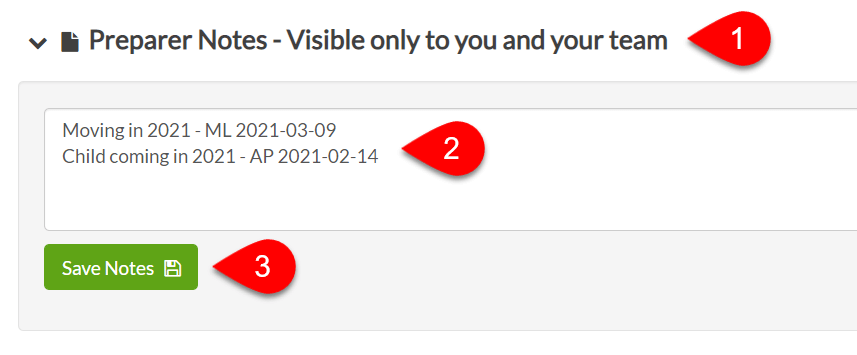
Add Preparer Notes to an Engagement
TaxFolder includes an area where you can add notes to the engagement. This is a plain-text box visible only to the preparers.
- On the Dashboard, click on the client’s name to open their record.
- Scroll to the Preparer Notes section.
- Type a note. Please note that only preparers with Admin access or those assigned to the engagement can modify existing notes. You can track and view engagement note history on the TaxFolder History page.
- Click Save Notes.
Print Preparer Notes
At the top of the client record, click the Print button. This prints only the client details and preparer notes.