Menu

T7DR(A) Pre-Printed Remittance Form

Updated: 2020-07-22

Pre-printed T7DRA discontinued

The Canada Revenue Agency (CRA) has discontinued the T7DRA pre-printed form. In its place, we will be including the new printable T7DRA form in TaxCycle T1, so you can print it and give it to your clients to can pay online, at their financial institution, or at a Canada Post retail outlet. Learn more in the T7DRA remittance form help topic.

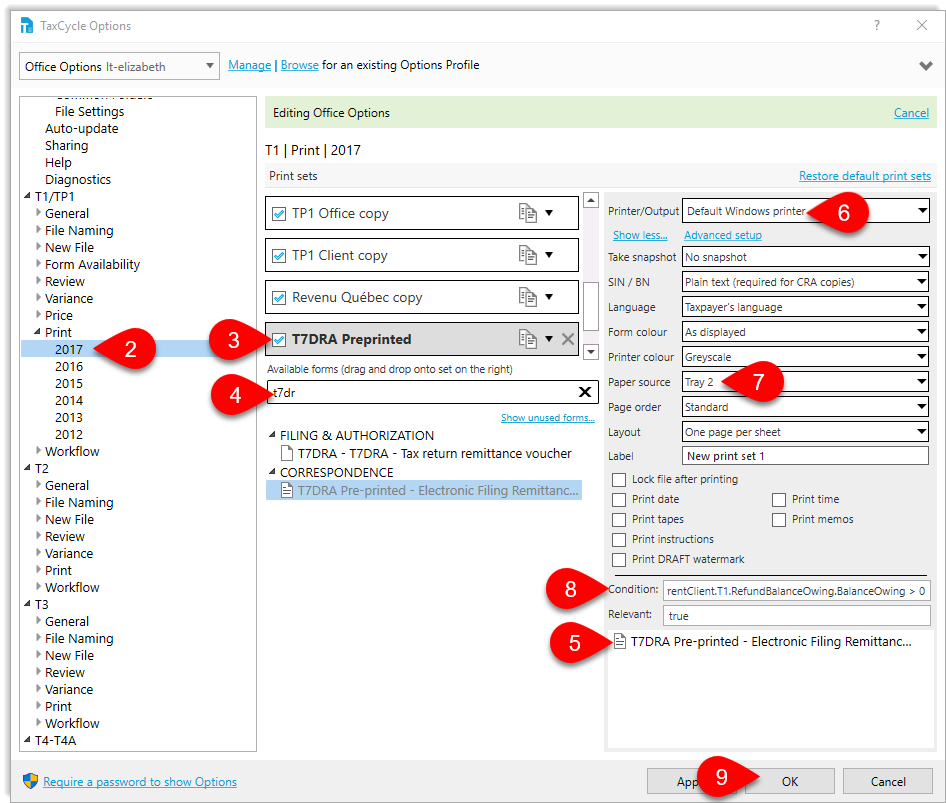
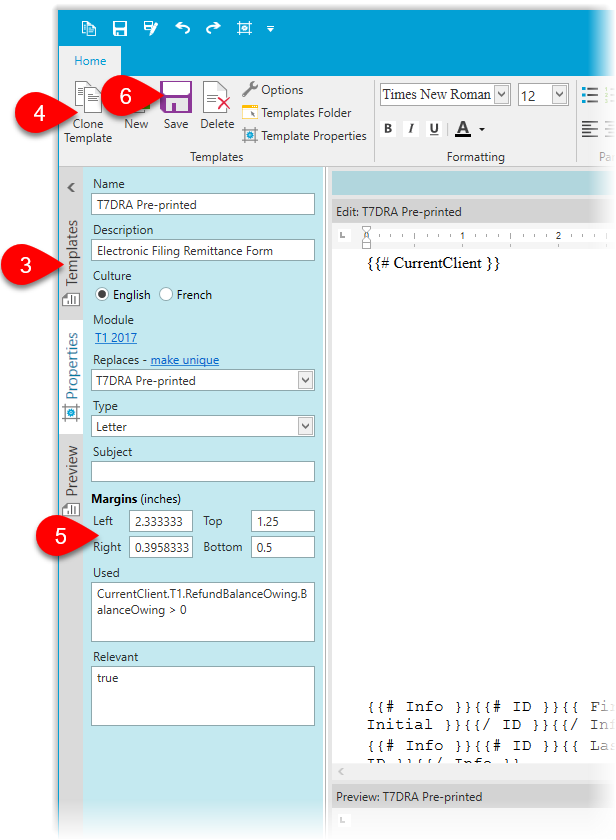
If you have pre-printed forms to use up, TaxCycle still includes a built-in template. However, it has been renamed to T7DRA Pre-printed. To adjust this template to your needs, read the instructions below.

Adjust the layout of the T7DRA Pre-printed template

Alignment of the printed values with the fields on the form may vary depending on the model of printer you use. TaxCycle's T7DRA Pre-printed template is designed so that if you adjust the top, left and right margins in the template properties (using the Template Editor), fields will line up in most cases.

  1. Open a return with a balance owing in TaxCycle T1.
  2. Go to the Tools menu, then click on Template Editor.
  3. In the Templates sidebar, find and click on the T7DRA Pre-printed template under the year of tax return you want to edit.
  4. Click on the Clone button to create a copy of the template (and preserve the original version in the process).
  5. In the Properties sidebar, adjust the values for the Left, Right and Top margins. Leave the Bottom margin alone. These are decimal values for inches, so you can actually pull out a ruler to measure the required adjustments. The template is designed to flex based on these margins. 
  6. Click Save.
  7. Click the Test Print button to try printing onto the pre-printed form to test the placement.
  8. Repeat these steps until you get the results you need.

adjust-margins-t7dra-preprinted

Save the template to other years

  1. In the Properties sidebar, click on the year under the Module section, such as T1 2017.
  2. In the dialog box that appears, check the years you want to apply to the module.
  3. Click OK to save the years into the template. 
  4. The template will appear in the other modules the next time you open TaxCycle and the Template Editor.

multiple-years-t7dra

Create a T7DR(A) pre-printed print set

You can print the T7DR(A) pre-printed as a single form, but if you're printing a whole return, it can be helpful to create a separate print set and set up a tray for the preprinted form.

  1. To open Options from the Start screen, click Options in the blue bar on the left side. If you have a file open, go to the File menu, then click Options.
  2. On the left side of the dialog box, expand the module (such as T1/TP1), then expand Print and click on the year you want to configure.
  3. Scroll to the bottom of the list of print sets and then double click on the New print set name. Name the set T7DRA Pre-printed, and drag it to wherever you want it to appear.
  4. In the search box above the list on the left, type T7DRA Pre-printed.
  5. Drag the form to the list on the right.
  6. Select the printer from the Printer/Output list.
  7. Choose the tray containing the pre-printed T7DR(A) forms the Paper source list.
  8. In the Condition field enter: CurrentClient.T1.RefundBalanceOwing.BalanceOwing > 0 This means the print set will only appear if there is a balance owing on the return.
  9. Click OK to save your changes. 

t7dra-pre-print-set